JDBC
Advanced Java
JDBC : To develop Persistence layer
Servlets : To develop Web layer
JSP : To develop Presentation layer
	JDBC --> Hibernate --> JPA
	Servlets --> Spring Web MVC
	JSP --> Angular / React JS
Prerequisites
	1) Core Java
		- Class
		- Object
		- Variables
		- Methods
		- Arrays
		- Strings
		- OOPS
	2) SQL (DDL, DML, DQL, DCL)
	3) Basics of HTML
What is Software Project ?
-
Collection of programs is called as Software Project
-
In industry we can see 3 types of software projects
  	1) Scratch Development (Brand New)
  	2) Maintenance / Support Projects
  	3) Migration Projects
Types of Applications using Java
Standalone Applications
Ex: Eclipse IDE, Calculator, Notepad++ etc..
Web Applications (C 2 B)
Ex: www.gmail.com, www.facebook.com etc...
Distributed Applications (B 2 B)
Ex: gpay, phonepay, paytm, makemytrip etc...
How to deliver project to client ?
Standalone Application
- The project which runs in only one machine
- Standalone applications we will deliver as JAR file (Java Archive)
- JAR contains collection of .class files
Web Application
- Everybody can access through browser
- Web Applications will be delivered as WAR file (Web Archive)
- To run "web application" war file we need Server (Ex: Tomcat)
Enterprise Application (Distributed Application)
-
Enterprise applications will be delivered as EAR file (Enterprise Archive)
  	JAR : Java Archieve
  	WAR : Web Archieve
  	EAR : Enterprise Archieve
Java Project Architecture
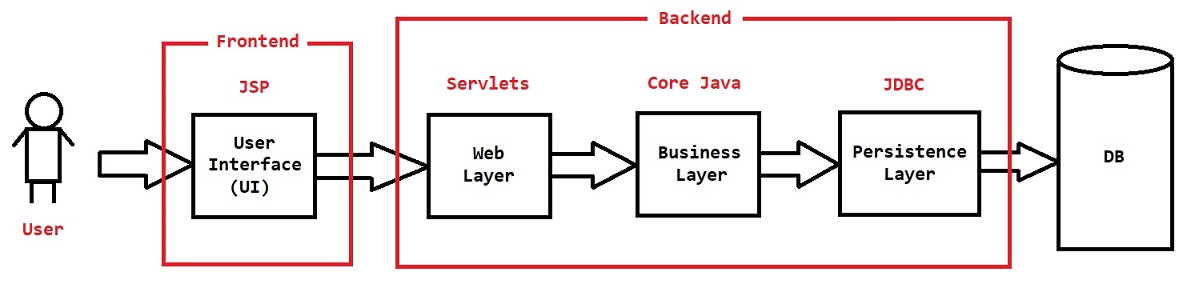
Presentation Layer : User Interface (UI)
	 - HTML & CSS
	 - Java Script
	 - BootStrap
	 - JSP (Java Server Pages)
	 - Angular / React JS
Web Layer : It contains logic to deal with Request & Response
	- Servlets
	- Spring Web MVC
Business Layer : It contains business logic
	- form validation
	- sending email
	- sending OTP
	- generate excel / pdf
	- calculations
Persistence Layer : It contains logic to communicate with database
	- JDBC
	- Spring JDBC
	- Hibernate
	- Data JPA
JAR Files
How to create JAR file
- JAR stands for Java Archive
- JAR contains collection of .class files
Executable jar (Runnable jar): jar files with entry point
Note: All jar file doesn't have a entry point
	// Syntax to create a jar file
	jar  cvfe  <filename.jar>  <main-class>  *.class
	a)  jar is a command to deal with jar files
			c - create
			v - verbose
			f - file
			e - entrypoint
	b)  main-class represents entrypoint for our application execution
	c) *.class means packaging all .class files available in current working directory
How to run JAR file
	// Syntax to run jar file
	java  -jar  <jar-file-name.jar>
Note: Only the jar files with entry point can be executed.
How to extract JAR file
	// Syntax to extract jar file
	jar -xvf  <jar-file-name.jar>
	x - extract
	v - verbose
	f - file
Note: -v flag is optional while creating and extracting a jar file.
Task:
	- Create User class & Student class
	- Compile both User & Student classes
	- Package User.class & Student.class as a jar file (Name: project.jar)
	- After jar is created then delete all .java & .class files
	- Create Demo.java class with main ( ) method. Create Objects for User & Student  and print hashCode of both objects.
CLASSPATH
-
Classpath is used to locate where our .class files / jar files are available
-
There are 4 ways to set classpath :
  	-cp : to set classpath for a particular command
  	-classpath : to set classpath for a particular command
  	Temporary settings by using the ‘set classpath’ command
  	Permanent settings using environment variable
-
To compile a java program,
javacrequires the source file and all the .class files which are being referred by the specified source file. -
To run a java program,
javacommand requires the .class file of the specified class and all the .class files which are being referred by the specified class. -
If all these .class files are not present in the same directory, then we need to specify the path for all the .class files.
-
You can add any no of paths to the classpath which are separated by
";". You can add the current directory to the classpath by using".".
What is the difference between PATH & CLASSPATH ?
- PATH is used to locate where our java s/w got installed
- CLASSPATH is used to locate where our .class files / jar files are available
- If we set PATH & CLASSPATH in command prompt then they are temporary. If we close CMD then we will loose them.
- To set them permanently we need to use Environment Variables.
What is API ?
- API stands for Application Programming Interface
- API contains set of classes and interfaces
- Sun Microsystem provided JSE API and JEE API
- JSE API contains set of classes & interfaces which are used to develop Standalone applications
- JEE API contains set of classes & interfaces which are used to develop Web applications.
- To understand classes, interfaces, methods available in the APIs Sun Microsystem provided documentation for us.
- JSE 8 API
How to create documentation for our project ?
- To create documentation for our project we can use below command
	// Syntax to create documentation
	javadoc *.java
- The above command will create several HTML files
- We need to open "index.html" file in browser to get documentation of our project.
Note: To provide metadata of our code (class, methods, interfaces) we will use java documentation comments
	// Documentation comment

	/**
	*
	*
	*
	*/
What is Build Path ?
-
Jar contains .class files
-
Jar files are also called as Libraries
-
When we want to use libraries in our project then we need to add them to the Build Path
  	1) servlet library we need to develop web app using java
  	2) To communicate with database we need jdbc library
Note: Loading the driver is optional if you are using IDE and you have set the build path in the IDE.
Java De-Compiler
- It is used to convert byte code to source code
- We can download java decompiler to convert byte code to source code
- Using below URL we can download Java De-Compiler
- Java Decompiler
Database
-
Database is a software which is used to store the data permanently
Ex: Oracle, MySQL, SQLServer, PostGresSQL
-
To work with database we need to install Database software
-
Database Server software will store the data in the form of tables, rows and columns
-
Database Client software is used to communicate with Database Server Software
  							      SQL
  	DataBase client -----------------------------------> Database Server
-
SQL (Structured Query Language) queries will be used to communicate with Database Server
-
To communicate with Oracle DB server we can use "SQL Developer" as a client software
-
To communicate with MySQL DB server we can use "MySQL Workbench" as a client software
JDBC
-
JDBC API released by Sun Microsystem
-
Using JDBC API we can communicate with Database software using Java Program
-
JDBC API will act as mediator between Java Program and Database software
  							JDBC API
  	Java Program ----------------------------------> Database Server
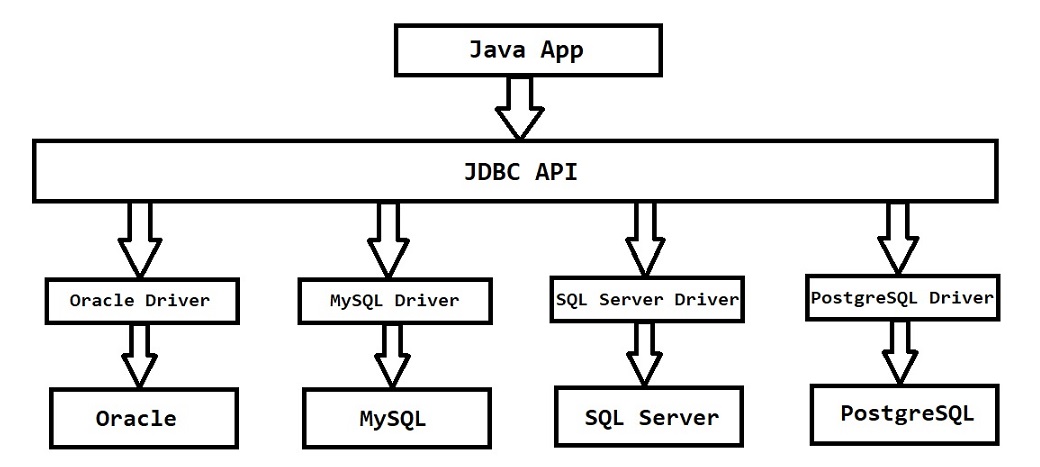
-
JDBC API contains set of interfaces & classes
-
Database Software vendors provided implementation for JDBC API. As part of JDBC API implementation they provided Database Driver
-
Every Database software having its own Driver.
  	Oracle Database ------------> Oracle Driver
  	MySQL Database ----------> MySQL Driver
  	SQL Server ------------------> SQL Server Driver
-
Driver is a program which knows how to connect with Database Software.
-
Database Driver software released as jar file
  	MySQL Driver ===========> mysql-connector.jar
  	Oracle Driver ==========> ojdbc8.jar
Note: We need to download that jar file and add to project build path.
JDBC API Components
Interfaces
	Driver
	Connection
	Statement
	PreparedStatement
	CallableStatement
	ResultSet
	RowSet
Classes
	DriverManager
	Types
	Date
Exceptions
SQLException
Steps to develop JDBC Program
	1) Load the Driver class
	2) Get Connection from Database
	3) Create Statement / Prepared Statement / Callable Statement
	4) Execute Query
	5) Process the Result
	6) Close the Connection
Note: Every database have limited no of connections, so we should always close the connection after our work is done.
Note: When we load the driver class, static block of driver class will be executed and it will register the driver.
Setup Database & Table in MySQL
- Connect to MySQL Database Server using MySQL Workbench
	-- To display list of databases available
	$ show databases;

	-- To create new database in DB server
	$ create database advjdb;

	-- To Select database to perform our operations
	$ use advjdb;

	-- To display all tables available in the database
	$ show tables;

	-- Create Table in the database
	CREATE TABLE BOOKS (
		BOOK_ID INT(10),
		BOOK_NAME VARCHAR(100),
		BOOK_PRICE INT(10)
	);

	-- To make changes permanent in database
	$ commit;
First JDBC Application
	// Java program to insert record into database
	package in.ashokit;

	import java.sql.Connection;
	import java.sql.DriverManager;
	import java.sql.Statement;

	public class InsertBook {
		private static final String DB_URL = "jdbc:mysql://localhost:3306/advjdb";
		private static final String DB_UNAME = "ashokit";
		private static final String DB_PWD = "AshokIT@123";
		private static final String INSERT_SQL = "INSERT INTO BOOKS VALUES(102, 'Python', 2000)";

		public static void main(String[] args) throws Exception {
			// Step-1 : Load Driver
			Class.forName("com.mysql.cj.jdbc.Driver");
			// Step-2 : Get DB Connection
			Connection con = DriverManager.getConnection(DB_URL, DB_UNAME, DB_PWD);
			// Step-3 : Create Statement
			Statement stmt = con.createStatement();
			// Step-4 : Execute Query
			int rowsEffected = stmt.executeUpdate(INSERT_SQL);
			// Step-5 : Process Result
			System.out.println("Record Inserted Count :: " + rowsEffected);
			// Step-6 : Close Connection
			con.close();
		}
	}
- To run the above program we need to set build path for mysql-connector-jar because mysql driver class will be available in mysql connector jar file.
- If we want to connect with oracle database we need to load oracle driver class and we need to set build path for ojdbc jar file because oracle driver class will be available in ojdbc jar.
Assignment 1: Develop JDBC application to update a record in database table.
Assignment 2: Develop JDBC application to delete a record from database table.
Types Of Queries
-
Database queries are divided into 2 types
  	1) DML & DDL Queries / Non-Select (CREATE, INSERT, UPDATE & DELETE)
  	2) DQL Quries / Select
	// Syntax to execute non-select queries
	int executeUpdate(String sql);
Note: The above method parameter represents query which we want to execute and method return type represents how many rows effected in db table with given query.
	// Syntax to execute select queries
	ResultSet executeQuery(String sql);
- ResultSet represents records returned by given select query.
Note: The above method parameter represents query which we want to execute and method return type represents records returned by given query.
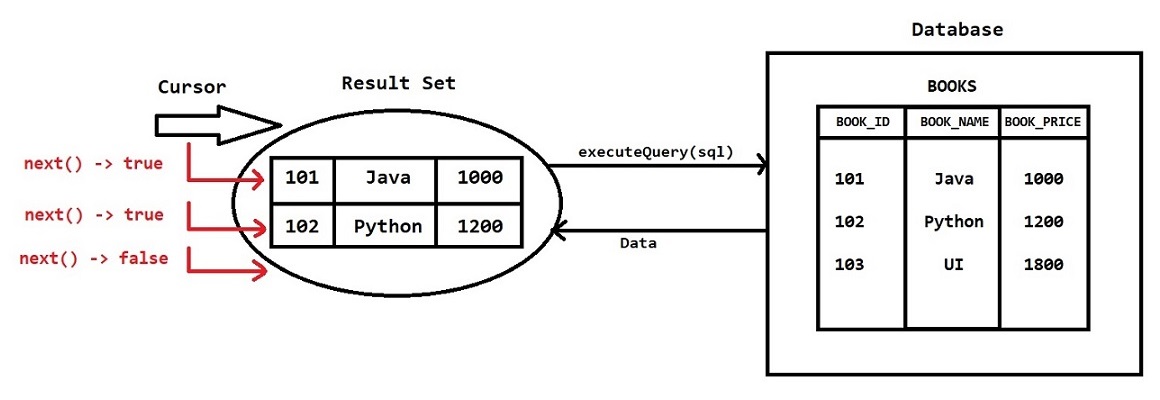
Select Operation using JDBC
- When we execute select query using JDBC then we will get data from database in the form of ResultSet object
- ResultSet Object will maintain a Cursor which will point to current row.
Note: Intially ResultSet cursor will point before first row. We need to move the cursor to next position by calling next ( ) method. - When record is present next ( ) method will return true otherwise it will return false.
	// JDBC Application to Select records from database
	package in.ashokit;

	import java.sql.Connection;
	import java.sql.DriverManager;
	import java.sql.Statement;
	import java.sql.ResultSet;

	public class SelectBooks {
		private static final String DB_URL = "jdbc:mysql://localhost:3306/advjdb";
		private static final String DB_UNAME = "ashokit";
		private static final String DB_PWD = "AshokIT@123";
		private static final String SELECT_SQL = "SELECT * FROM BOOKS WHERE BOOK_ID = 1002";

		public static void main(String[] args) throws Exception {
			Class.forName("com.mysql.cj.jdbc.Driver");
			Connection con = DriverManager.getConnection(DB_URL, DB_UNAME, DB_PWD);
			Statement stmt = con.createStatement();
			ResultSet rs = stmt.executeQuery(SELECT_SQL);

			if (rs.next()) {
				int bookid = rs.getInt("BOOK_ID");
				String name = rs.getString("BOOK_NAME");
				double price = rs.getDouble("BOOK_PRICE");

				System.out.println(bookid);
				System.out.println(name);
				System.out.println(price);
			} else {
				System.out.println("No Records Found");
			}
			con.close();
		}
	}
Requirement : Write a java program to retrieve all the records from the database table and display on the console.
	// Java program to retrieve all the records from database table
	package in.ashokit;

	import java.sql.Connection;
	import java.sql.DriverManager;
	import java.sql.Statement;
	import java.sql.ResultSet;

	public class SelectBooks {
		private static final String DB_URL = "jdbc:mysql://localhost:3306/advjdb";
		private static final String DB_UNAME = "ashokit";
		private static final String DB_PWD = "AshokIT@123";
		private static final String SELECT_SQL = "SELECT * FROM BOOKS";

		public static void main(String[] args) throws Exception {
			Class.forName("com.mysql.cj.jdbc.Driver");
			Connection con = DriverManager.getConnection(DB_URL, DB_UNAME, DB_PWD);
			Statement stmt = con.createStatement();
			ResultSet rs = stmt.executeQuery(SELECT_SQL);

			while (rs.next()) {
				System.out.println(rs.getInt("BOOK_ID"));
				System.out.println(rs.getString("BOOK_NAME"));
				System.out.println(rs.getDouble("BOOK_PRICE"));
			}
			con.close();
		}
	}
Note : By Default ResultSet cursor will move in forward direction. Based on the Requirement we can make it as Bi Directional.
Assignment 1 : Registration & Login
- Develop User Registration and User Login Functionality.
- For Registration and Login read the data from keyboard.
- We should not insert user record with duplicate email. If any user trying to register with duplicate email application should show error message.
	// Assignment 1 : Registration & Login
	import java.sql.Connection;
	import java.sql.DriverManager;
	import java.sql.PreparedStatement;
	import java.sql.ResultSet;
	import java.sql.SQLException;
	import java.sql.Statement;
	import java.util.Scanner;

	public class LoginRegistration {
		private static final String DB_URL = "jdbc:mysql://localhost:3306/advjdb";
		private static final String DB_UNAME = "ashokit";
		private static final String DB_PWD = "AshokIT@123";

		public static void main(String[] args) throws Exception {
			String name;
			String email;
			String pass;
			String no;
			Character choice;

			Class.forName("com.mysql.cj.jdbc.Driver");
			Connection con = DriverManager.getConnection(DB_URL, DB_UNAME, DB_PWD);
			Statement st = con.createStatement();
			PreparedStatement ps;
			ResultSet rs;

			boolean flag = true;

			do {
				System.out.println("Choose one option : ");
				System.out.println("1. Registration (Press 'R')");
				System.out.println("2. Login (Press 'L')");
				System.out.println("3. Print All Users (Press 'P')");
				System.out.println("4. Quit (Press 'Q')");
				System.out.print("\nEnter your choice : ");

				Scanner sc = new Scanner(System.in);
				choice = sc.nextLine().toUpperCase().charAt(0);

				switch (choice) {
				case 'R':
					System.out.println("\nRegistration Strated ...");

					System.out.print("Enter name : ");
					name = sc.nextLine();

					System.out.print("Enter email : ");
					email = sc.nextLine();

					ps = con.prepareStatement("SELECT EMAIL FROM USER WHERE EMAIL = ?");
					ps.setString(1, email);
					rs = ps.executeQuery();

					if(rs.next()) {
						System.out.println("Duplicate email");
						System.out.println("Registration ended\n");
						break;
					}

					System.out.print("Enter pass : ");
					pass = sc.nextLine();

					System.out.print("Enter mobile no : ");
					no = sc.nextLine();

					ps = con.prepareStatement("INSERT INTO USER VALUES(?, ?, ?, ?)");
					ps.setString(1, name);
					ps.setString(2, email);
					ps.setString(3, pass);
					ps.setString(4, no);
					ps.executeUpdate();

					System.out.println("Registration successfull\n");

					break;

				case 'L' :
					login(con, sc);

					break;

				case 'P' :
					print(st);

					break;

				case 'Q' :
					flag = false;
					break;
				default:
					System.out.println("Invalid choice");
					break;
				}
			} while(flag);

			con.close();
		}

		private static void print(Statement st) throws SQLException {
			ResultSet rs;
			rs = st.executeQuery("SELECT * FROM USER");
			System.out.println("\nPrinting started ...");
			while(rs.next()) {
				System.out.print(rs.getString(1)+" ");
				System.out.print(rs.getString(2)+" ");
				System.out.print(rs.getString(3)+" ");
				System.out.println(rs.getString(4));
			}
			System.out.println("Printing ended\n");
		}

		private static void login(Connection con, Scanner sc) throws SQLException {

			String email;
			String pass;
			PreparedStatement ps;
			ResultSet rs;

			System.out.println("\nLogin Started ...");

			System.out.print("Enter email : ");
			email = sc.nextLine();

			System.out.print("Enter pass : ");
			pass = sc.nextLine();

			ps = con.prepareStatement("SELECT PASS FROM USER WHERE EMAIL = ?");
			ps.setString(1, email);

			rs = ps.executeQuery();

			if(rs.next() && pass.equals(rs.getString("PASS"))) {
					System.out.println("Login successfull\n");
			} else {
				char logFlag;
				System.out.println("Invalid Credentials");
				System.out.println("Do you want to try again ?");
				System.out.println("Pres 'Y' for Yes or 'N' for No");

				logFlag = sc.nextLine().toUpperCase().charAt(0);

				if(logFlag == 'Y') {
					login(con,sc);
				} else {
					System.out.println();
				}
			}
		}
	}
ResultSet
- ResultSet will represent data given by our select query
- ResultSet will maintains cursor to point the rows
- Initially ResultSet cursor will be available before first row
- We need to move RS cursor to next position by calling next ( ) method
-
There are three types of ResultSets
  	1) TYPE_FORWARD_ONLY (By default)
  	2) TYPE_SCROLL_INSENSITIVE
  	3) TYPE_SCROLL_SENSITIVE
Note: By Default ResultSet is FORWARD_DIRECTIONAL
-
SENSITIVE & INSENSITIVE ResultSets are scrollable and Bi-Directional
-
ResuletSet Concurrency will represent changes of ResultSet data. There are two types of ResultSet Concurrency
  	1) CONCUR_READ_ONLY
  	2) CONCUR_UPDATABLE
-
CONCUR_READ_ONLY will allow only read operation on the ResultSet
-
CONCUR_UPDATABLE will allow update operations also on the ResultSet
	// Java Program using ResultSet
	import java.sql.Connection;
	import java.sql.DriverManager;
	import java.sql.ResultSet;
	import java.sql.Statement;

	public class Test {
		private static final String DB_URL = "jdbc:mysql://localhost:3306/advjdb";
		private static final String DB_UNAME = "ashokit";
		private static final String DB_PWD = "AshokIT@123";

		public static void main(String[] args) throws Exception {
			Class.forName("com.mysql.cj.jdbc.Driver");
			Connection con = DriverManager.getConnection(DB_URL, DB_UNAME, DB_PWD);
			Statement st = con.createStatement(ResultSet.TYPE_SCROLL_SENSITIVE, ResultSet.CONCUR_UPDATABLE);
			ResultSet rs = st.executeQuery("select * from books");

			rs.absolute(2);
			rs.updateInt(3, 2500);
			rs.updateRow();

			con.close();
		}
	}
	// Java Program using ResultSet
	package in.ashokit;

	import java.sql.Connection;
	import java.sql.DatabaseMetaData;
	import java.sql.DriverManager;
	import java.sql.ResultSet;
	import java.sql.ResultSetMetaData;
	import java.sql.Statement;

	public class SelectBooks {
		private static final String DB_URL = "jdbc:mysql://localhost:3306/advjdb";
		private static final String DB_UNAME = "ashokit";
		private static final String DB_PWD = "AshokIT@123";
		private static final String SELECT_SQL = "SELECT BOOK_ID, BOOK_NAME, BOOK_PRICE FROM BOOKS";

		public static void main(String[] args) throws Exception {
			Class.forName("com.mysql.cj.jdbc.Driver");
			Connection con = DriverManager.getConnection(DB_URL, DB_UNAME, DB_PWD);
			Statement stmt = con.createStatement(ResultSet.TYPE_SCROLL_INSENSITIVE, ResultSet.CONCUR_UPDATABLE);
			ResultSet rs = stmt.executeQuery(SELECT_SQL);

			System.out.println("Query Execution Completed... Data available in ResultSet...");
			while (rs.next()) {
				System.in.read();
				System.in.read();
				rs.refreshRow();
				System.out.println(rs.getInt(1) + "---" + rs.getString(2) + "--" + rs.getDouble(3));
			}
			con.close();
		}
	}
Q: What is difference between SENSITIVE and INSENSITIVE ResultSet ?
-
SENSITIVE and INSENSITIVE ResultSets both are Bi Directional.
-
The difference is SENSITIVE ResultSet will fetch latest data from database if any changes happen at the database table.
-
INSENSITIVE ResultSet will fetch the data from the database table and will store into ResultSet object. It will give data from ResultSet object only and it will not check with database table for updated data.
-
When we use SENSITIVE ResultSet with refreshRow( ) always it will compare ResultSet row data with database table row data. If it is not matching then it will get updated data from database.
-
With the above code the advantage is application always will give latest data to user.
-
If we have lakhs of records it will decrease performrnce of application because it has to compare every row.
Note: We need to use Type-1 and Type-2 drivers to work with SENSITIVE and INSENSITIVE ResultSet. Our Query should not contain*symbol. We need to use column names in the query.boolean next( ) : To move cursor next position boolean absolute(int row) : To move cursor to specific row boolean last( ) : To move cursor to last row boolean previous( ) : To move cursor to previous row int getInt(int index) : To get current row column data based on column index int getInt(String columnName) : To get current row column data based on column name void refreshRow( ) : Refreshes the current row with its most recent value in the database
ResultSetMetaData
- Using ResultSet we can access ResultSet metadata
- Using ResultSet metadata we can get columns count and column names also
Note: Column index will always start from one.
	// Java Program on ResultSetMetaData
	import java.sql.Connection;
	import java.sql.DriverManager;
	import java.sql.ResultSet;
	import java.sql.ResultSetMetaData;
	import java.sql.Statement;

	class Test {
		private static final String DB_URL = "jdbc:mysql://localhost:3306/advjdb";
		private static final String DB_UNAME = "ashokit";
		private static final String DB_PWD = "AshokIT@123";

		public static void main(String[] args) throws Exception {
			Class.forName("com.mysql.cj.jdbc.Driver");
			Connection con = DriverManager.getConnection(DB_URL, DB_UNAME, DB_PWD);
			Statement st = con.createStatement();
			ResultSet rs = st.executeQuery("select * from books");

			ResultSetMetaData metaData = rs.getMetaData();

			System.out.print("Column count : "+metaData.getColumnCount());
			System.out.println();

			for(int i = 1; i <= metaData.getColumnCount(); i++) {
				String name = metaData.getColumnName(i);
				System.out.println(name);
			}

			con.close();
		}
	}
Prepared Statement
-
PreparedStatement is used to execute both Select & Non-Select Queries
-
PreparedStatement will support for Positional Parameters ( ? ) in the query
-
Positional Parameters are used to supply dynamic values to query in the run time.
-
When we want to execute same query multiple times with different values then it is highly recommended to use PreparedStatement.
-
PreparedStatement compiles only once and can be resued multiple times with different parameters.
  	Query Without Positional Parameters
  	INSERT INTO BOOKS VALUES (101, "JAVA", 5000);

  	Query With Positional Parameters
  	INSERT INTO BOOKS VALUES (?, ?, ?);
Note: Positional Parameters index will start from 1.
	public String login (String name , String pwd ) {
		"select * from user where names = ' "+name+" ' and pass = ' "+pwd+" ' ";
	}

	name : ashok--
	pwd: 123

	select * from users where uname=ashok -- and pwd = 123;
Note: By using PreparedStatement we can avoid SQL injections. We should not prepare a query using concatenation because in that case there is a chance of SQL injection.
	// Java Program using PreparedStatement
	import java.sql.Connection;
	import java.sql.DriverManager;
	import java.sql.PreparedStatement;
	import java.sql.ResultSet;
	import java.sql.ResultSetMetaData;
	import java.sql.Statement;
	import java.util.Scanner;

	class Test {
		private static final String DB_URL = "jdbc:mysql://localhost:3306/advjdb";
		private static final String DB_UNAME = "ashokit";
		private static final String DB_PWD = "AshokIT@123";

		public static void main(String[] args) throws Exception {
			Class.forName("com.mysql.cj.jdbc.Driver");
			Connection con = DriverManager.getConnection(DB_URL, DB_UNAME, DB_PWD);
			PreparedStatement ps = con.prepareStatement("insert into books values(?, ?, ?)");

			ps.setInt(1, 104);
			ps.setString(2, "AWS");
			ps.setInt(3, 4000);

			int rowsInserted = ps.executeUpdate();
			System.out.println("Rows Inserted : "+rowsInserted);

			con.close();
		}
	}
- When the query is having positional parameters we have to set the values for those parameters before executing the query.
- If we don't set the values for positional parameters then our query execution will fail.
Assignment 2 : Retrieve Books
- Develop JDBC application to retrieve books which are having price less than given price.
- Ask user to enter the price in keyboard, if user entered the price then we have to fetch books which are having price less than user given price and display to console.
- If user don't enter price then fetch all books and display to console.
	// Assignment 2 : Retrieve Books
	package in.ashokit;

	import java.sql.Connection;
	import java.sql.DriverManager;
	import java.sql.PreparedStatement;
	import java.sql.ResultSet;
	import java.util.Scanner;

	public class DynamicSelectBooks {
		private static final String DB_URL = "jdbc:mysql://localhost:3306/advjdb";
		private static final String DB_UNAME = "ashokit";
		private static final String DB_PWD = "AshokIT@123";

		public static void main(String[] args) throws Exception {
			Scanner s = new Scanner(System.in);
			System.out.println("Enter Price");
			double price = s.nextDouble();

			Connection con = DriverManager.getConnection(DB_URL, DB_UNAME, DB_PWD);

			StringBuilder sql = new StringBuilder("SELECT * FROM BOOKS");
			if (price > 0) {
				sql.append(" WHERE BOOK_PRICE <= ?");
			}

			PreparedStatement pstmt = con.prepareStatement(sql.toString());
			if (price > 0) {
				pstmt.setDouble(1, price);
			}

			ResultSet rs = pstmt.executeQuery();

			while (rs.next()) {
				System.out.println(rs.getInt(1) + "--" + rs.getString(2) + "--" + rs.getDouble(3));
			}

			con.close();
		}
	}
- In the above task we have condition based search operation to achieve this requirement we need to prepare the query dynamically, if user don't give the price we need to execute query
select * from books - If user gives the price we need to execute query
select * from books where book_price <= ?
Assignment 3 : Retrieve Employees
- Develop a JDBC application to retrieve employee records from the database table based on the given search criteria.
- If user don't give any value for search criteria we need to fetch all the records.
- If user provide search criteria based on the given criteria we need to fetch records.
Note: User may provide any one value or any two value or all three value or none of the value for the search criteria.
	-- Creating Employee Table
	CREATE TABLE EMPLOYEE (
		EMP_ID INT PRIMARY KEY,
		EMP_NAME VARCHAR(100),
		EMP_SALARY INT,
		EMP_DEPT VARCHAR(100),
		EMP_GENDER VARCHAR(10),
		WORK_LOCATION VARCHAR(100)
	);

	-- Inserting Records into Employee Table
	INSERT INTO EMPLOYEE VALUES (1, 'John', 15000.00, 'Admin', 'Male', 'Hyd');
	INSERT INTO EMPLOYEE VALUES (2, 'Smith', 16000.00, 'HR', 'Male', 'Delhi');
	INSERT INTO EMPLOYEE VALUES (3, 'Anil', 7000.00, 'Security', 'Male', 'Hyd');
	INSERT INTO EMPLOYEE VALUES (4, 'Rose', 12000.00, 'HR', 'FeMale', 'Hyd');
	INSERT INTO EMPLOYEE VALUES (5, 'Cathy', 16000.00, 'Sales', 'FeMale', 'Delhi');
	// Assignment 3 : Retrieve Employees
	package in.ashokit;

	import java.sql.Connection;
	import java.sql.DriverManager;
	import java.sql.PreparedStatement;
	import java.sql.ResultSet;
	import java.util.Scanner;

	public class SearchEmps {
		private static final String DB_URL = "jdbc:mysql://localhost:3306/advjdb";
		private static final String DB_UNAME = "ashokit";
		private static final String DB_PWD = "AshokIT@123";

		public static void main(String[] args) throws Exception{
			Scanner s = new Scanner(System.in);

			System.out.println("Enter Dept :: ");
			String dept = s.next();

			System.out.println("Enter Location :: ");
			String workLocation  = s.next();

			System.out.println("Enter Gender :: ");
			String gender = s.next();

			StringBuilder sql = new StringBuilder("SELECT * FROM EMPLOYEE WHERE 1=1 ");

			if(dept!=null && !dept.equals("null")){
				sql.append(" AND EMP_DEPT= ?");
			}

			if(workLocation!=null && !workLocation.equals("null")) {
				sql.append(" AND WORK_LOCATION = ?");
			}

			if(gender!=null && !gender.equals("null")) {
				sql.append(" AND EMP_GENDER = ?");
			}

			Connection con = DriverManager.getConnection(DB_URL, DB_UNAME, DB_PWD);

			PreparedStatement  pstmt = con.prepareStatement(sql.toString());

			int index = 1;

			if(dept!=null && !dept.equals("null")){
				pstmt.setString(index, dept);
				index ++;
			}

			if(workLocation!=null && !workLocation.equals("null")) {
				pstmt.setString(index, workLocation);
				index ++;
			}

			if(gender!=null && !gender.equals("null")) {
				pstmt.setString(index, gender);
			}

			ResultSet rs = pstmt.executeQuery();

			while(rs.next()) {
				System.out.println(rs.getInt(1) + "--" +rs.getString(2)+"--"+rs.getInt(3)+"--"+
						rs.getString(4)+"--"+rs.getString(5)+ "--"+rs.getString(6));
			}
			con.close();
		}
	}
Assignment 4 : Salary Increment
- Develop a JDBC application to provide increment for each employee. Ask user for how much
%increment should be given in salary. Update the updated salary in database table.
	// Assignment 4 : Approach 1 (Not Recommended)
	package in.ashokit;

	import java.sql.Connection;
	import java.sql.DriverManager;
	import java.sql.PreparedStatement;
	import java.sql.ResultSet;
	import java.sql.Statement;
	import java.util.Scanner;

	public class EmpHike {
		private static final String DB_URL = "jdbc:mysql://localhost:3306/advjdb";
		private static final String DB_UNAME = "ashokit";
		private static final String DB_PWD = "AshokIT@123";
		private static final String SELECT_SQL = "SELECT * FROM EMPLOYEE";
		private static final String UPDATE_SAL_SQL = "UPDATE EMPLOYEE SET EMP_SALARY=? WHERE EMP_ID=?";

		public static void main(String[] args) throws Exception {
			Scanner s = new Scanner(System.in);
			System.out.println("Enter Emp Hike :: ");
			double hike = s.nextDouble();

			Connection con = DriverManager.getConnection(DB_URL, DB_UNAME, DB_PWD);
			Statement stmt = con.createStatement();
			ResultSet rs = stmt.executeQuery(SELECT_SQL);
			PreparedStatement pstmt = con.prepareStatement(UPDATE_SAL_SQL);

			while(rs.next()) {
				int empId = rs.getInt("EMP_ID");
				double existingSal = rs.getDouble("EMP_SALARY");
				double newSal = existingSal + (existingSal * hike) / 100;
				pstmt.setDouble(1, newSal);
				pstmt.setInt(2, empId);
				pstmt.executeUpdate();
			}

			System.out.println("Update completed....");
			con.close();
		}
	}
- In the above program we have implemented the logic at java side to increase the salary of the employees for every employee one update query will execute to update salary with hike.
- If we have one lakh records in the table then one lakh times update query will execute. If we have one crore then one crore times update query will execute.
- It will decrease performance of the application. To overcome this problem we can use below approach.
	// Assignment 4 : Approach - 2 (Recommended)
	package in.ashokit;

	import java.sql.Connection;
	import java.sql.DriverManager;
	import java.sql.PreparedStatement;
	import java.sql.ResultSet;
	import java.sql.Statement;
	import java.util.Scanner;

	public class EmpHike {
		private static final String DB_URL = "jdbc:mysql://localhost:3306/advjdb";
		private static final String DB_UNAME = "ashokit";
		private static final String DB_PWD = "AshokIT@123";

		public static void main(String[] args) throws Exception {
			Scanner s = new Scanner(System.in);
			System.out.println("Enter Emp Hike :: ");
			double hike = s.nextDouble();

			Connection con = DriverManager.getConnection(DB_URL, DB_UNAME, DB_PWD);

			String UPDATE_SAL_SQL = "UPDATE EMPLOYEE SET EMP_SALARY=EMP_SALARY + (EMP_SALARY * ?) / 100 ";

			PreparedStatement pstmt = con.prepareStatement(UPDATE_SAL_SQL);
			pstmt.setDouble(1, hike);

			pstmt.executeUpdate();

			System.out.println("Update completed....");
			con.close();
		}
	}
Note: With the above code in the single shoot we can update the salary of all the employees because business logic will execute at database.
Requirement
- Develop JDBC application to increase employees salary based on Department.
- Read Hike Percentage for each department from Keyboard and then update salary with given percentage.
	// JDBC Application to give salary hike
	import java.sql.Connection;
	import java.sql.DriverManager;
	import java.sql.PreparedStatement;
	import java.sql.ResultSet;
	import java.util.Scanner;

	class Test {
		private static final String DB_URL = "jdbc:mysql://localhost:3306/advjdb";
		private static final String DB_UNAME = "ashokit";
		private static final String DB_PWD = "AshokIT@123";

		public static void main(String[] args) throws Exception {
			Class.forName("com.mysql.cj.jdbc.Driver");
			Connection con = DriverManager.getConnection(DB_URL, DB_UNAME, DB_PWD);
			Scanner sc = new Scanner(System.in);

			System.out.print("Enter Admin dept hike : ");
			int admin = sc.nextInt();
			System.out.println();

			System.out.print("Enter HR dept hike : ");
			int hr = sc.nextInt();
			System.out.println();

			System.out.print("Enter Security dept hike : ");
			int security = sc.nextInt();
			System.out.println();

			System.out.print("Enter Sales dept hike : ");
			int sales = sc.nextInt();
			System.out.println();

			PreparedStatement ps = con.prepareStatement("update employee set emp_salary = emp_salary + (emp_salary*?/100) where emp_dept = ?");

			ps.setInt(1, admin);
			ps.setString(2, "Admin");
			ps.executeUpdate();

			ps.setInt(1, hr);
			ps.setString(2, "HR");
			ps.executeUpdate();

			ps.setInt(1, security);
			ps.setString(2, "Security");
			ps.executeUpdate();

			ps.setInt(1, sales);
			ps.setString(2, "Sales");
			ps.executeUpdate();

			System.out.println("Update done ..");
			con.close();
		}
	}
- In the above program dept wise hike will be decided so for every dept we need to execute one update query.
- If we have 500 dept in the company then our java program should communicate with database 500 time to execute 500 update queries. It is not at all recommended because it will decrease performance of the application.
Note: If you have so many database calls from java then network traffic will increase between java and database which will reduce performance of the application. To avoid this problem we need to write business logic at the database by using procedures.
Callable Statement
-
Procedure means a database program which will have set of SQL statements to perform one or more operations.
-
From the java application we will call the procedure then procedure will execute at the database and will complete the operation at the database side only.
-
By writing procedures in the database we can reduce no of calls between java and database.
-
To call the procedures we will use CallableStatement.
-
Procedures are equal to our java methods. Procedure will have a name, procedure will take input and procedure may or may not return the output.
-
For procedures input and output is not mandatory.
-
Syntax to create Procedure is given below
  	CREARE PROCEDURE <PROCEDURE-NAME> (params....)
  	BEGIN
  		// SQL STATEMENTS
  	END;
-
A procedure can have 3 types of Parameters
  	1) IN    ----> represents input
  	2) OUT  ----> represents output
  	3) INOUT  ----> represents both input & output
	-- Procedure without IN & OUT Parameters
	DELIMITER $$
	CREATE PROCEDURE getBooksData( )
	BEGIN
		SELECT * FROM BOOKS;
	END $$

	-- Call the procedure in workbench
	call getBooksDat( );
	// JDBC App to fetch records from DB using Procedure
	package in.ashokit;

	import java.sql.CallableStatement;
	import java.sql.Connection;
	import java.sql.DriverManager;
	import java.sql.ResultSet;

	public class ProcedureCallEx {
		private static final String DB_URL = "jdbc:mysql://localhost:3306/advjdb";
		private static final String DB_UNAME = "ashokit";
		private static final String DB_PWD = "AshokIT@123";
		private static final String PROCEDURE = "call getBooksData()";

		public static void main(String[] args) throws Exception{
			Connection con  = DriverManager.getConnection(DB_URL,DB_UNAME,DB_PWD);

			CallableStatement cstmt = con.prepareCall(PROCEDURE);

			ResultSet rs = cstmt.executeQuery();

			while(rs.next()) {
				System.out.println(rs.getInt(1) + "-"+rs.getString(2)+"-"+rs.getDouble(3));
			}
			con.close();
		}
	}
	-- PROCEDURE WITH IN PARAMETER
	DELIMITER $$
	CREATE PROCEDURE getBookById(IN BID INT)
	BEGIN
		SELECT * FROM BOOKS WHERE BOOK_ID = BID;
	END $$

	-- Call the procedure in workbench
	call getBookById(101);
	// JDBC App to retrieve book by id using Procedure
	package in.ashokit;

	import java.sql.CallableStatement;
	import java.sql.Connection;
	import java.sql.DriverManager;
	import java.sql.ResultSet;
	import java.util.Scanner;

	public class ProcedureINParamEx {
		private static final String DB_URL = "jdbc:mysql://localhost:3306/advjdb";
		private static final String DB_UNAME = "ashokit";
		private static final String DB_PWD = "AshokIT@123";
		private static final String PROCEDURE = "call getBookById(?)";

		public static void main(String[] args) throws Exception{
			Scanner s = new Scanner(System.in);
			System.out.print("Enter Book Id :: ");
			int bookId = s.nextInt();

			Connection con  = DriverManager.getConnection(DB_URL,DB_UNAME,DB_PWD);

			CallableStatement cstmt = con.prepareCall(PROCEDURE);
			cstmt.setInt(1, bookId);

			ResultSet rs = cstmt.executeQuery();

			while(rs.next()) {
				System.out.println(rs.getInt(1) + "-"+rs.getString(2)+"-"+rs.getDouble(3));
			}
			con.close();
		}
	}
	-- Procedure with IN & OUT Parameters
	DELIMITER $$
	CREATE PROCEDURE getBookNameByPrice(
		IN bprice INT,
		OUT bname VARCHAR(100)
	)

	BEGIN
		SELECT BOOK_NAME as bname from BOOKS where BOOK_PRICE <= bprice ;
	END $$

	-- Call the procedure in workbench
	call getBookNameByPrice(5000, @result);
	// JDBC App to get book price by name using Procedure
	package in.ashokit;

	import java.sql.CallableStatement;
	import java.sql.Connection;
	import java.sql.DriverManager;
	import java.sql.ResultSet;
	import java.sql.Types;
	import java.util.Scanner;

	public class ProcedureINOUTParamEx2 {
		private static final String DB_URL = "jdbc:mysql://localhost:3306/advjdb";
		private static final String DB_UNAME = "ashokit";
		private static final String DB_PWD = "AshokIT@123";
		private static final String PROCEDURE = "call getBookNameByPrice(?, ?)";

		public static void main(String[] args) throws Exception {
			Scanner s = new Scanner(System.in);
			System.out.print("Enter Book Price :: ");
			double bookPrice = s.nextDouble();

			Connection con = DriverManager.getConnection(DB_URL, DB_UNAME, DB_PWD);

			CallableStatement cstmt = con.prepareCall(PROCEDURE);
			cstmt.setDouble(1, bookPrice);
			cstmt.registerOutParameter(2, Types.VARCHAR);

			ResultSet rs = cstmt.executeQuery();

			while (rs.next()) {
				System.out.println(rs.getString(1));
			}
			con.close();
		}
	}
	-- Function getBookPriceById
	delimiter ##
	create function getBookPriceById(bid int) returns int deterministic
	begin
			declare bprice int;
	        select book_price into bprice from books where book_id = bid;
	        return bprice;
	end ##

	-- Call the function in workbench
	select getBookPriceById(101) from dual;
	// JDBC App to retrieve records from db using Stored Function
	import java.sql.CallableStatement;
	import java.sql.Connection;
	import java.sql.DriverManager;
	import java.sql.ResultSet;
	import java.sql.Types;

	class Test {
		private static final String DB_URL = "jdbc:mysql://localhost:3306/advjdb";
		private static final String DB_UNAME = "ashokit";
		private static final String DB_PWD = "AshokIT@123";

		public static void main(String[] args) throws Exception {
			Connection con = DriverManager.getConnection(DB_URL, DB_UNAME, DB_PWD);

			CallableStatement cs = con.prepareCall("{ ? = call getBookPriceById(?) }");

			cs.registerOutParameter(1, Types.INTEGER);
			cs.setInt(2, 101);
			ResultSet rs = cs.executeQuery();

			rs.next();
			System.out.println(rs.getInt(1));

			con.close();
		}
	}
JDBC Batch Operations
-
Batch means Bulk Operation
-
When we want to perform Bulk Operations in Database then we can use JDBC Batch Operations concept.
Ex: insert 100 records into table at a time
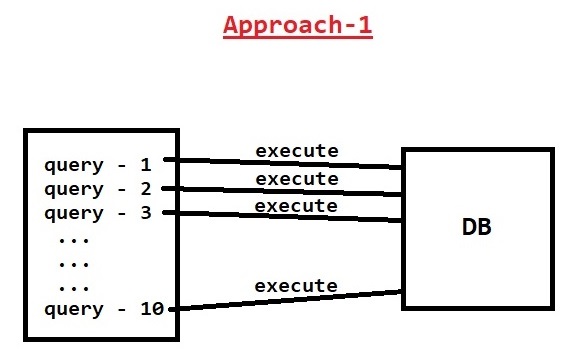
- In approach-1 we are executing queries independently so for every query execution java application will communicate with database it will decrease performance of the application.
- To avoid this problem we can use batch operations. In batch operations all the queries will be added to batch object and we will execute the batch only one time
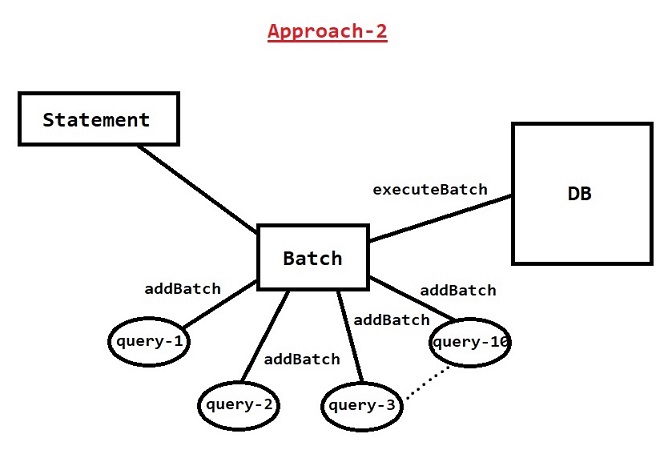
- When we execute the batch all the queries added to the batch will be executed at a time (it will improve performance of the application)
- In batch operation if one query fail then all the remaining query also will fail.
Note: Batch operations we can use to perform only non-select operations.
	// JDBC App using Batch Operation
	import java.sql.Connection;
	import java.sql.DriverManager;
	import java.sql.Statement;

	public class BatchOpsEx {
		private static final String DB_URL = "jdbc:mysql://localhost:3306/advjdb";
		private static final String DB_UNAME = "ashokit";
		private static final String DB_PWD = "AshokIT@123";

		public static void main(String[] args) throws Exception {
			Connection con = DriverManager.getConnection(DB_URL, DB_UNAME, DB_PWD);
			Statement stmt = con.createStatement();

			stmt.addBatch("INSERT INTO BOOKS VALUES(106, 'AI', 2800.00)");
			stmt.addBatch("INSERT INTO BOOKS VALUES(107, 'ML', 3800.00)");
			stmt.addBatch("INSERT INTO BOOKS VALUES(108, 'DS', 4800.00)");

			int[] count = stmt.executeBatch();
			System.out.println("Records Effected ::" + count.length);

			con.close();

			System.out.println("Execution Completed...");
		}
	}
Assignment - 1 : Insert 3 records into table using Batch Operation with PreparedStatement.
Assignment - 2 : Read Employee & Emp Address Data from keyboard and insert into DB table.
		Emp Data: ID, Name & Salary
		Address Data : City, State, Country
- Employee data should be inserted into EMP table and Address data should be inserted into EMP_ADDRESS table.
- One employee can have multiple addresses like permanent address, present address, office address etc so it is not recommended to store all the data into one table.
- Address table should contain the reference of employee id to identify which address belongs to which employee.
- Employee id column in the address table will represent the relation between employee table and address table.
- To fulfill above requirement we need to create two tables like below
	CREATE TABLE EMP (
		EMP_ID    INT,
		EMP_NAME VARCHAR(100),
		EMP_SALARY INT
	);

	CREATE TABLE EMP_ADDRESS (
		CITY VARCHAR(50),
		STATE VARCHAR(50),
		COUNTRY VARCHAR(50),
		EMP_ID INT
	);
Transactions in JDBC
-
Single unit amount of work is called as Transaction
-
We can execute multiple Queries in single transaction
Note: Every Transaction should follow ACID PropertiesA - Atomicity C - Consistency I - Isolation D - Durability
Note: When we are performing Non-Select Operations (insert / update / delete) with database then Transaction is mandatory.
-
For Select Operations Transaction is optional.
-
When we are performing multiple operations in single transaction then either all the operations should be success or none of the operation should be success.
  	Transcation Commit  -  to save the operation permanently
  	Transaction Rollback - to undo the operation
-
In JDBC, transaction will be committed by default for every non select query execution because by default Transaction AutoCommit is true.
	// This is default behaviour of Connection obj
	con.setAutoCommit(true);
- If we want to manage Transactions in JDBC we need to set AutoCommit as False.
con.setAutoCommit(false);
Note: When Auto Commit is false, we need to commit the transaction programmatically to save our operation in database.
	// Transaction Management Code Snippet
	Connnection con = DriverManager.getConnection(url, uname,pwd);
	con.setAutoCommit(false);
	try{
		// logic to execute queries
		con.commit( );
	} catch(Exception e){
		con.rollback( );
	}
	// JDBC App using Transaction Management
	package in.ashokit;

	import java.sql.Connection;
	import java.sql.DriverManager;
	import java.sql.PreparedStatement;

	public class EmpAddrInsert {
		private static final String DB_URL = "jdbc:mysql://localhost:3306/advjdb";
		private static final String DB_UNAME = "ashokit";
		private static final String DB_PWD = "AshokIT@123";
		private static final String EMP_INSERT = "INSERT INTO EMP VALUES(?,?,?)";
		private static final String EMP_ADDR_INSERT = "INSERT INTO ADDRESS VALUES(?,?,?,?)";

		public static void main(String[] args) throws Exception {
			Connection con = DriverManager.getConnection(DB_URL, DB_UNAME, DB_PWD);

			// By Default conn - autoCommit mode is true
			con.setAutoCommit(false);

			try {
				PreparedStatement pstmt = con.prepareStatement(EMP_INSERT);
				pstmt.setInt(1, 101);
				pstmt.setString(2, "John");
				pstmt.setDouble(3, 1000.00);

				pstmt.executeUpdate();

				pstmt = con.prepareStatement(EMP_ADDR_INSERT);
				pstmt.setString(1, "Hyd");
				pstmt.setString(2, "TG");
				pstmt.setString(3, "India");
				pstmt.setInt(4, 101);

				pstmt.executeUpdate();

				con.commit();

				System.out.println("Records Inserted...");
			} catch (Exception e) {
				System.out.println("Transcation Rolled Back....");
				con.rollback();
			}
			con.close();
		}
	}
Requirement : Develop JDBC application to read EMP_ID from Keyboard and then retrieve emp data along with address based on given emp_id from Database table.
	// JDBC App to retrieve data using join
	import java.sql.Connection;
	import java.sql.DriverManager;
	import java.sql.PreparedStatement;
	import java.sql.ResultSet;

	public class SelectEmpWithAddr {
		private static final String DB_URL = "jdbc:mysql://localhost:3306/advjdb";
		private static final String DB_UNAME = "ashokit";
		private static final String DB_PWD = "AshokIT@123";
		private static final String EMP_SELECT = "SELECT * FROM EMP e, EMP_ADDRESS a WHERE e.emp_id = a.emp_id and e.emp_id = ?";

		public static void main(String[] args) throws Exception {
			Connection con = DriverManager.getConnection(DB_URL, DB_UNAME, DB_PWD);

			PreparedStatement pstmt = con.prepareStatement(EMP_SELECT);
			pstmt.setInt(1, 101);

			ResultSet rs = pstmt.executeQuery();

			while (rs.next()) {
				System.out.println(rs.getInt(1));
				System.out.println(rs.getString(2));
				System.out.println(rs.getDouble(3));
				System.out.println(rs.getString(4));
				System.out.println(rs.getString(5));
				System.out.println(rs.getString(6));
			}
			con.close();
		}
	}
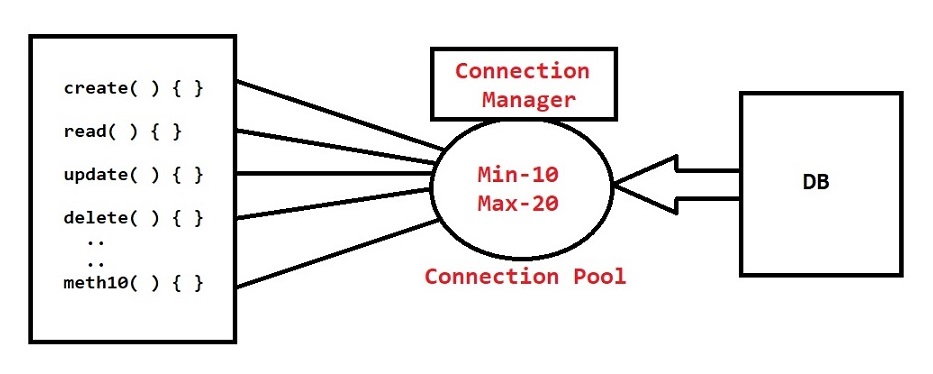
Connection Pooling
- Connection Pooling is the process of getting fixed no of connections from database and store them into a pool for re-usability.
- If we don't use Connection Pooling concept then our project will run into Connections Exhausted Problem (No connections available to communicate with db)
- If we use
DriverManager.getConnection( )it will give physical connection with database. It is not at all recommended to use Physical Connections. - Always we need to use Logical Connections to perform DB operations. To use Logical connections we need to setup Connection Pool.
Note: With the connection pooling we can improve performance of the application because it will reduce the round trips between java application and database.
How to setup Connection Pool
-
We can setup Connection Pool in 2 ways
  	1) Client Side Connection Pool
  			Ex: DBCP, C3P0, Hikari etc....
  	2) Server Managed Connection Pool
  			Ex: Tomcat, JBoss, WebLogic etc...
Steps to Setup Hikari Connection Pool
		1) Create Java Project in IDE
		2) Add below jars to project build path
				a) Hikari-CP.jar
				b) SLF4J-api.jar
				c) mysql-connector.jar
		3) Create Java class to setup connection pool like below
	// JDBC App using Hikari Connection Pool
	package in.ashokit;

	import java.sql.Connection;
	import java.sql.Statement;
	import com.zaxxer.hikari.HikariConfig;
	import com.zaxxer.hikari.HikariDataSource;

	public class ConnectionFactory {
		private static final String DB_URL = "jdbc:mysql://localhost:3306/advjdb";
		private static final String DB_UNAME = "ashokit";
		private static final String DB_PWD = "AshokIT@123";

		public static void main(String[] args) throws Exception {
			HikariConfig config = new HikariConfig();

			config.setJdbcUrl(DB_URL);
			config.setUsername(DB_UNAME);
			config.setPassword(DB_PWD);

			config.setMaximumPoolSize(20);
			config.setMinimumIdle(5);

			HikariDataSource datasource = new HikariDataSource(config);

			Connection con = datasource.getConnection();

			String sql = "INSERT INTO BOOKS VALUES (202, 'Django', 4500.00)";

			Statement stmt = con.createStatement();

			stmt.executeUpdate(sql);

			System.out.println("RECORD INSERTED.....");
			con.close();
		}
	}
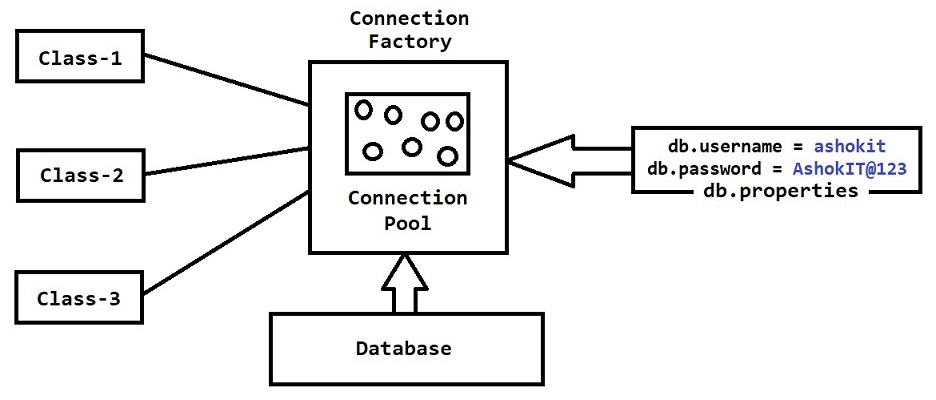
Properties files in Java
-
As of now in JDBC programs we have declared database properties which is not at all recommended because if database properties are modified then we need to modify our java programs also.
Note: In realtime project we will have multiple databases like belowa) Dev DB (Developers will use this db) b) SIT DB (Testers will use this db) c) UAT DB (client side testing will happen with this db) d) Prod DB (live application will use this db)
Note: Every database will have different credentials so when we want to change the database then we have to change our java programs which is not a good practice.
-
We need to separate our Java programs with Database Properties using properties file
-
Properties file is used to configure properties in the form of key-value pair
Note: file name can be anything but extension should be .properties only -
To work with properties files we have
java.util.Propertiesclass. Using this class we can store the data in properties file and we can get data from properties file.load(InputStream is) --> To load all properties into Properties object getProperty(String key) ---> To load property value based on given key setProperty(String key, String value) ---> To set new property with key-value pair size( ) ---> To get count of properties
	// Java Program using Properties
	import java.io.FileInputStream;
	import java.util.Properties;

	class Demo {
		public static void main(String[] args) throws Exception {
			FileInputStream fis = new FileInputStream("db.properties");

			Properties p = new Properties();
			p.load(fis);

			System.out.println(p.getProperty("db.url"));
			System.out.println(p.getProperty("db.uname"));
			System.out.println(p.getProperty("db.pwd"));

			fis.close();
		}
	}
- Connection pool should be created only one time when the project starts and we need to re-use connections from pool for our database operations.
	// ConnectionFactory.java
	package in.ashokit;

	import java.io.File;
	import java.io.FileInputStream;
	import java.sql.Connection;
	import java.util.Properties;
	import javax.sql.DataSource;

	import com.zaxxer.hikari.HikariConfig;
	import com.zaxxer.hikari.HikariDataSource;

	public class ConnectionFactory {
		private static DataSource datasource = null;

		static {
			try {
				File f = new File("DB.properties");
				FileInputStream fis = new FileInputStream(f);

				Properties p = new Properties();
				p.load(fis);

				String url = p.getProperty("db.url");
				String uname = p.getProperty("db.uname");
				String pwd = p.getProperty("db.pwd");
				String poolSize = p.getProperty("db.poolSize");

				HikariConfig config = new HikariConfig();

				config.setJdbcUrl(url);
				config.setUsername(uname);
				config.setPassword(pwd);
				config.setMaximumPoolSize(Integer.parseInt(poolSize));

				datasource = new HikariDataSource(config);
			} catch (Exception e) {
				e.printStackTrace();
			}
		}

		public static Connection getDBConnection() throws Exception {
			return datasource.getConnection();
		}
	}
	// BookStore.java
	package in.ashokit;

	import java.sql.Connection;
	import java.sql.ResultSet;
	import java.sql.Statement;

	public class BookStore {
		public static void main(String[] args) throws Exception {
			Connection con = ConnectionFactory.getDBConnection();
			Statement stmt = con.createStatement();
			ResultSet rs = stmt.executeQuery("select * from books");

			while (rs.next()) {
				System.out.println(rs.getInt(1) + "--" + rs.getString(2) + "--" + rs.getDouble(3));
			}

			rs.close();
			stmt.close();
			con.close();
		}
	}
Note: We need to close the resources in the reverse order in which they were opened. If we do not close the resources the pool manager will close them automatically.
Requirement: Develop a JDBC application to insert image into database.
	-- Create Person Table
	create table person (pid int, pimage blob(1000));
	// JDBC App to Insert image into database table
	package in.ashokit;

	import java.io.File;
	import java.io.FileInputStream;
	import java.sql.Connection;
	import java.sql.PreparedStatement;

	public class BookStore {
		public static void main(String[] args) throws Exception {
			File f = new File("file-path");
			FileInputStream fis = new FileInputStream(f);

			Connection con = ConnectionFactory.getDBConnection();

			String sql = "INSERT INTO PERSON VALUES (?, ?)";

			PreparedStatement pstmt = con.prepareStatement(sql);

			pstmt.setInt(1, 101);
			pstmt.setBlob(2, fis);

			int count = pstmt.executeUpdate();

			System.out.println("Rows Inserted :: " + count);

			pstmt.close();
			con.close();
		}
	}
Requirement: Develop a JDBC application to read Image from database and store it to a file.
	// JDBC App to read a image from database
	package in.ashokit;

	import java.io.FileOutputStream;
	import java.io.InputStream;
	import java.sql.Blob;
	import java.sql.Connection;
	import java.sql.ResultSet;
	import java.sql.Statement;

	public class BookStore {
		public static void main(String[] args) throws Exception {
			Connection con = ConnectionFactory.getDBConnection();

			Statement stmt = con.createStatement();
			ResultSet rs = stmt.executeQuery("SELECT * FROM PERSON");

			if (rs.next()) {
				System.out.println(rs.getInt(1));
				byte[] stream = rs.getBytes(2);

				FileOutputStream fos = new FileOutputStream("path\\image.png");
				fos.write(stream);
				fos.close();
			}
			con.close();
		}
	}
Note: When we are reading image from database we can't print that image on the console. We need to store that image into a file using file output stream.
RowSet
- RowSet is predefined interface available in
java.sqlpackage - It is a sub interface of ResultSet
- By using RowSet we can execute sql queries
	// JDBC Program using RowSet
	import javax.sql.rowset.JdbcRowSet;
	import javax.sql.rowset.RowSetProvider;

	public class BookStore {
		public static void main(String[] args) throws Exception {
			JdbcRowSet rowSet = RowSetProvider.newFactory().createJdbcRowSet();

			rowSet.setUrl("jdbc:mysql://localhost:3306/advjdb");
			rowSet.setUsername("ashokit");
			rowSet.setPassword("AshokIT@123");

			rowSet.setCommand("select * from books")
			rowSet.execute();

			while (rowSet.next()) {
				System.out.print(rowSet.getInt(1) + "\t");
				System.out.print(rowSet.getString(2) + "\t");
				System.out.println(rowSet.getInt(3));
			}
			rowSet.close();
		}
	}
Types of JDBC Drivers
-
In JDBC we have 4 types of drivers
  	a) Type-1 Driver
  	b) Type-2 Driver
  	c) Type-3 Driver
  	d) Type-4 Driver
Note: Type-1, Type-2, Type-3 drivers are outdated, we are using Type-4 driver.
Debugging
What is Debugging ?
-
The process of executing the code line by line is called as Debugging
-
Using Debugging we can do the following things
  	We can understand program execution flow
  	We can find bugs in the code
  	We can test behaviour of our code
How to do Debugging ?
-
Choose breakpoint in the program
-
Run the program in Debug mode
-
Use Debugging shortcuts to execute the program
  	F5 - Go inside the method
  	F6 - Go nextline
  	F7 - To come back to caller method
  	F8 - Go to next break point
Drop to Frame
- It is used to re-start method execution without stopping the program
Note: We can modify variable values in runtime using Variables Palette.
Servlet
Servlet
- Servlet is a Technology given by Sun microsystem which is part of JEE API.
- Servlet technology is used to develop Web Applications using Java.
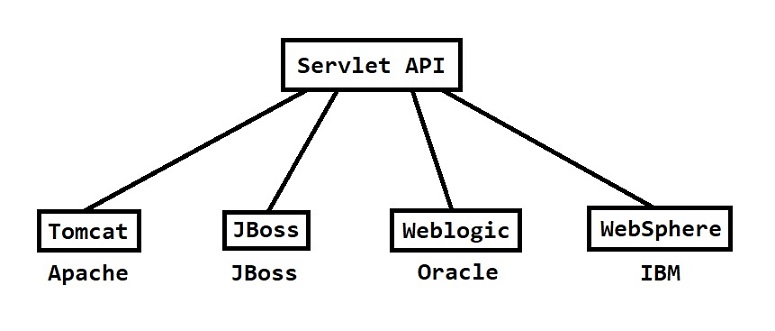
What is Web Application ?
-
The application which can be accessed by multiple users at a time is called as Web application.
Ex: Gmail, Facebook, Naukri, IRCTC etc...
-
Web Applications are used for Customer to Business Communication (C 2 B).
-
Web application will run inside a Server.
Ex: Apache Tomcat, JBOSS, WebLogic, WebSphere, Glassfish etc..
Note: Server is a program which is used to run web applications
Web Application Architecture
-
In web application architecture mainly 2 actors will be available
  	1) Client
  	2) Server
-
Client means a person / system which will send request to server to access web application.
-
Server is a software / program which is responsible to process request and send response to clients.

Note: Multiple clients can send requests to server at a time.
Steps to develop Web Applications
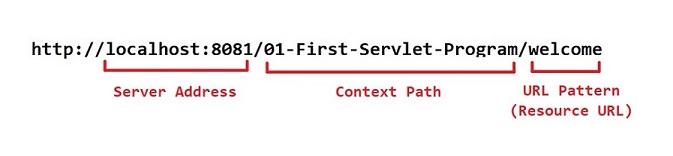
	1) Setup Server Software (Download & Install)
	2) Create Dynamic Web Project using IDE
	3) Setup Build Path for required libraries (servlet-api.jar)
	4) Create Servlet Classes to handle request & response
	5) Map servlet classes to URL Patterns
	6) Compile our source code (.class files will be created)
	7) Package .class files as war file (WAR means Web Archieve)
	8) Deploy war file in Server.
	9) Once application deployment completed then we can access our application in the browser using application URL.
			URL : http: // Server-Machine-IP : Server-Port / AppName / URL-Pattern
Note: Every Servlet should have unique URL pattern in the project.
	/login    ---> LoginServlet
	/register ---> RegisterServlet
	/dashboard ---> DashoboardServlet
Deployment : Keeping the war file in the server is called as Deployment.
Re-Deployment : Deploying latest war file into server is called Re-Deployment.
Un-Deployment : Removing war file from server is called as Un-Deployment.
Hot Deployment : Deploying only modified files in the server.
Note: In real time hot deployment will be used.
Apache Tomcat
- Apache Tomcat server developed by Apache Organization
- Apache Tomcat is free & open source web server
- Using Apache Tomcat we can run our java Web applications
- Apache Tomcat server developed using Java Language
- To run Tomcat Server Java s/w is mandatory
- Apache Tomcat Server Runs on Port Number 8080 (it is default port, we can change it also)
Note: To run Tomcat Server in your system, you need to set path for JAVA_HOME (path upto java installation directory)
Note: If Oracle is installed in your system, then you can't use 8080 as port number for Tomcat.
Tomcat Setup in Windows
-
We can setup Tomcat server in 2 ways
  	1) Download Installer software and install it
  	2) Download Zip file and extract it
Tomcat Server Folder Structure
bin : It contains binary files to start & stop the server (startup.bat & shutdown.bat)
lib : It contains libraries (jars)
conf : It contains configuration files (server.xml & tomcat-users.xml)
webapps : This is called as Deployment folder (we need to keep war files here for deployment)
temp : It contains temporary files we can delete them
logs : It contains server execution log files
Note: We can change tomcat server default port in conf/server.xml file
-
We can configure users in tomcat to access tomcat server admin dashboard.
conf/tomcat-users.xml
-
We can deploy war file from Tomcat Server Admin dashboard as well..
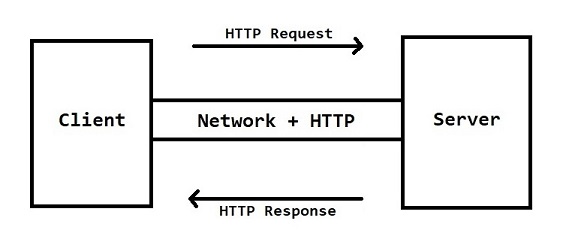
HTTP Protocol
-
Http stands for Hyper Text Transfer Protocol
-
Http Protocol acts as a mediator between client & server
-
Http Protocol divided into 2 parts
  	1) Http Request
  	2) Http Response
-
Client will send Http request to the server, server will process that request and will send Http response to the client.
HTTP Request Format & HTTP Response Format
-
Browser will convert client request url into Http Request Object.
-
Http will send this Http Request Object to the server.
-
Server will analyse & process the request.
-
After processing the request, server will send response in the form of Http Response Object to the Http.
-
Http will convert this Http Response Object into browser understandable format.
-
Http Request Object will have
  	Request line  --->  Method + URL
  	Request Header  --->  Metadata
  	Blank line  --->  To separate request header & body
  	Request body  --->  It will contain request payload
-
Http Response Object will have
  	Response line  --->  Method + Status Code + Status Msg
  	Response Header  --->  Metadata
  	Blank line  --->  To separate response header & body
  	Response body  --->  It will contain response payload
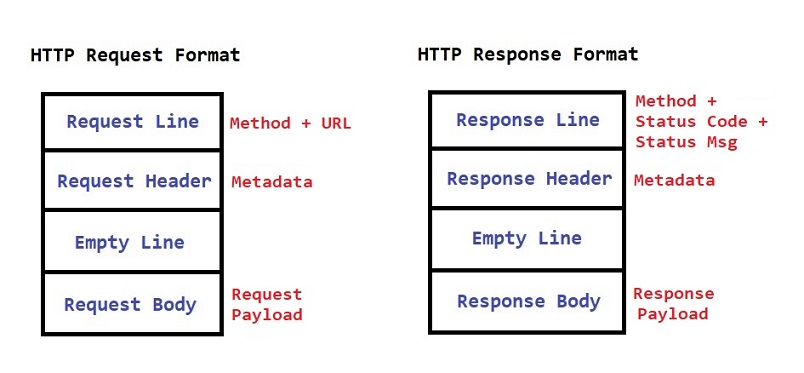
Note: Client can send data in request url as well as in the request body also but server can send data in response body only.
HTTP Methods
GET : To get the data from server
POST : To send data to server (insertion)
PUT : To update the data
DELETE : To delete the data
Note: In servlets we will use only GET & POST method.
HTTP Status Codes
	1xx  --->  Information Codes (100 - 199)
	2xx  --->  Success Codes (200 - 299)
	3xx  --->  Redirection Codes (300 - 399)
	4xx  --->  Client Error Codes (400 - 499)
	5xx  --->  Server Error Codes (500 - 599)
Servlet API
-
Servlet is a API given by Sun Micro System as part of JEE
-
Server vendors provided implementation for Servlet API
-
Web Server contains below 2 containers
  	1) Servlet Container
  	2) JSP Container
Note: Container provide environment to run our web application.
- Servlet Container is used to execute Servlet applications
- JSP Container is used to execute JSP pages
There are 3 Definitions for Servlets
- Servlet is a technology which is used to develop Web Applications
- Servlet is an API which is provided by Sun Microsystem
- Servlet is an interface available in
javax.servletpackage
Steps to Develop Web Application using Servlet
	1) Create Dynamic Web Project in IDE
	2) Add 'servlet-api.jar' file to project build path
	3) Create a Servlet class by extending HttpServlet class & write required methods to handle request & response.
	4) Configure servlet in web.xml (deployment descriptor) or use Annotation to map with url-pattern
	5) Run the web application using Server
	// First Servlet Application

	import java.io.IOException;
	import java.io.PrintWriter;

	import javax.servlet.annotation.WebServlet;
	import javax.servlet.http.HttpServlet;
	import javax.servlet.http.HttpServletRequest;
	import javax.servlet.http.HttpServletResponse;

	@WebServlet("/welcome")
	public class WelcomeServlet extends HttpServlet {
		public void doGet(HttpServletRequest req, HttpServletResponse resp) throws IOException {
			PrintWriter pw = resp.getWriter();
			pw.append("<h1>Welcome to Servlets</h1>");
		}
	}
HttpServletis a predefined class which is used to develop our servlet classes.@WebServletis a annotation which is used to map servlet class to URL Pattern.
Note: URL Pattern is used to access the servlet and every servlet should have a unique URL Pattern in the project.doGet()is predefined method available inHttpServletclass and we are overriding that method in our servlet class to handle get request sent by client.
	// doGet method Syntax
	public void doGet(HttpServletRequest req, HttpServletResponse resp) throws IOException {
		// logic
	}
-
HttpServletRequestObject represents client given request information and data (HttpRequest Structure). -
HttpServletResponseObject is used to send the response to client. -
There are three ways to create a servlet
  - By implementing Servlet interface
  - By extending GenericServlet class
  - By extending HttpServlet class (Recommended)
	// Servlet Application to Greet User

	import java.io.IOException;
	import java.io.PrintWriter;

	import javax.servlet.annotation.WebServlet;
	import javax.servlet.http.HttpServlet;
	import javax.servlet.http.HttpServletRequest;
	import javax.servlet.http.HttpServletResponse;

	@WebServlet("/greet")
	public class GreetServlet extends HttpServlet {
		public void doGet(HttpServletRequest req, HttpServletResponse resp) throws IOException {
			PrintWriter pw = resp.getWriter();
			pw.append("<h1>Good Morning</h1>");
		}
	}
How Server will process each request ?
- Client will send request using Browser (GET or POST)
- Browser will convert that request into HTTP Request and will send to Server
- Server will recieve the request and it will create Request and Response objects
- Server will open Http Request and it will take the client request information and it will store into Request object.
- Server will identify the resource which is requested by the client based on URL (Context-Path and URL-Pattern).
Note: If requested resource is not available then server will prepare Error response & it will store it into Response object.
- If requested resource is available then server will call that servlet method by passing Request and Response Objects.
- Servlet will execute the business logic and it will write the response to Response Object.
- Server will send final Response to client which is available in Response object.
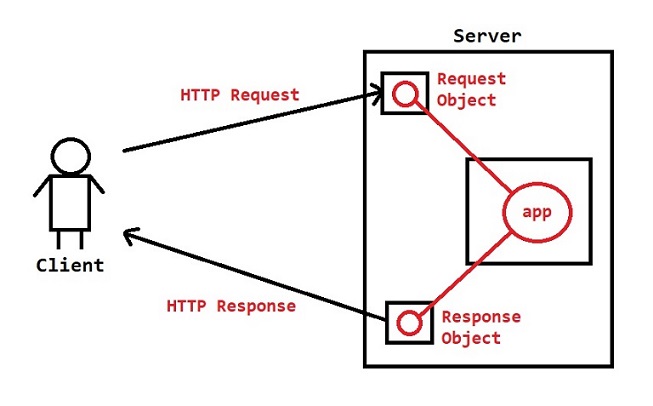
Note: To process client requests, server will use Threads. For every request one thread will be created.
- After sending response to client, server will delete request & response objects from memory.
Note : HTTP is a stateless protocol that means it will not remember anything about previous requests. It will treat every request as first request.
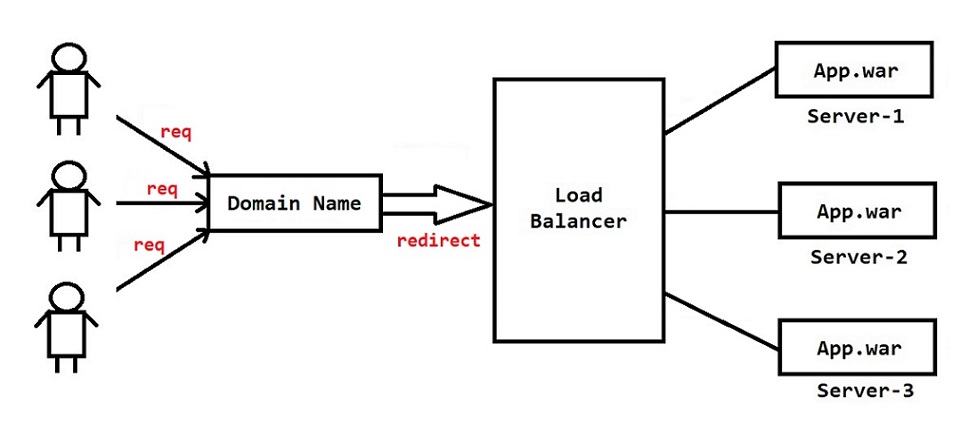
Note: When multiple users access our application at a time then burden will increase on the server. When burden increased then our server might crash. If server is crashed then our application will be down (nobody can access, it will effect our business).
- To reduce burden on the servers, we will deploy our application in multiple servers using Load Balancer concept.
Requirement: Develop Web Application To display Greet Message to user based on current hour.
	6 AM - 11:55 AM  ===> Good Morning
	12:00 PM - 4:00 PM ===> Good Afternoon
	4:00 PM - 8:00 PM ===> Good Evening
	8:00 PM - 5:55 AM ===> Good Night
	import java.io.IOException;
	import java.io.PrintWriter;
	import java.time.LocalTime;

	import javax.servlet.annotation.WebServlet;
	import javax.servlet.http.HttpServlet;
	import javax.servlet.http.HttpServletRequest;
	import javax.servlet.http.HttpServletResponse;

	@WebServlet("/greet")
	public class GreetUser extends HttpServlet {
		public void doGet(HttpServletRequest req, HttpServletResponse resp) throws IOException {
			LocalTime time = LocalTime.now();
			PrintWriter pw = resp.getWriter();

			if(time.isAfter(LocalTime.of(6, 0)) && time.isBefore(LocalTime.of(11, 55))) {
				pw.write("<h1>Good Morning !!</h1>");
			} else if(time.isAfter(LocalTime.of(12, 0)) && time.isBefore(LocalTime.of(16, 0))) {
				pw.write("<h1>Good Afternoon !!</h1>");
			} else if(time.isAfter(LocalTime.of(16, 0)) && time.isBefore(LocalTime.of(20, 0))) {
				pw.write("<h1>Good Evening !!</h1>");
			} else if(time.isAfter(LocalTime.of(20, 0)) || time.isBefore(LocalTime.of(5, 55))) {
				pw.write("<h1>Good Night !!</h1>");
			} else {
				pw.write("<h1>No Greetings !!</h1>");
			}
		}
	}
What is web.xml file ?
- web.xml file is called as deployment descriptor file
- We can map servlets to url-pattern using web.xml file
- We can configure welcome-file using web.xml file
Mapping Servlet to URL Pattern using web.xml
-
To configure url pattern for the servlet we use
<servlet>and<servlet-mapping>tags. -
<servlet>element contains following tags:<servlet-name> ---> It contains servlet name (It can be any name) <servlet-class> ---> It contains fully qualified name of the servlet class
-
<servlet-mapping>element contains following tags:<servlet-name> ---> It contains servlet name (It can be any name) <url-pattern> ---> It contains url pattern of the servlet
Note:
<servlet-name>should contain the same name in both<servlet>and<servlet-mapping>.
	<!-- URL-Pattern configuration in web.xml -->
	<web-app >
		<servlet>
			<servlet-name>greetservlet</servlet-name>
			<servlet-class>in.ashokit.GreetServlet</servlet-class>
		</servlet>

		<servlet-mapping>
			<servlet-name>greetservlet</servlet-name>
			<url-pattern>/greet</url-pattern>
		</servlet-mapping>
	</web-app>
What is Welcome File ?
- Welcome File is the default page of our web application.
- When we send the request to our application url then welcome page will open by default.
- We can use any name for the welcome file.
	<!-- Welcome page configuration in web.xml -->
	<web-app>
		<welcome-file-list>
			<welcome-file>index.html</welcome-file>
		</welcome-file-list>
	</web-app>
Note: We can configure multiple welcome file also.
	<!-- Multiple welcome pages configuration in web.xml -->
	<web-app>
		<welcome-file-list>
			<welcome-file>index.html</welcome-file>
			<welcome-file>index.jsp</welcome-file>
		</welcome-file-list>
	</web-app>
- First it will check for index.html in the project, if it is available then it will load it as welcome page.
- If index.html not available then it will check for index.jsp page, if it is available then it will load it as welcome page.
Note: If both files are not available then it will show error page with 404 status code (resource not found).
Accessing Servlet From HTML File
	<!-- index.html -->
	<body>
		<h1>Welcome to My Application</h1>
		<a href="welcome"> Welcome Msg </a> <br />
		<a href="greet"> Greet Msg </a>
	</body>
	// WelcomeServlet.java
	@WebServlet("/welcome")
	public class WelcomeServlet extends HttpServlet {
		public void doGet(HttpServletRequest req, HttpServletResponse resp) throws IOException {
			PrintWriter pw = resp.getWriter();
			pw.append("<h1>Welcome to Servlets</h1>");
		}
	}
	// GreetServlet.java
	@WebServlet("/greet")
	public class GreetServlet extends HttpServlet {
		public void doGet(HttpServletRequest req, HttpServletResponse resp) throws IOException {
			PrintWriter pw = resp.getWriter();
			pw.append("<h1>Good Morning</h1>");
		}
	}
Note: First href attribute accessing WelcomeServlet using url-pattern ("/welcome") and second href attribute accessing GreetServlet using url-pattern ("/greet").
How to access Servlet from the Form
Requirement : Develop a web application to take username from the form and display welcome msg on the browser.
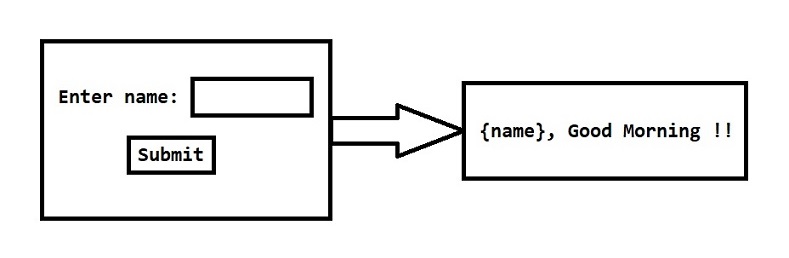
	<!-- index.html -->
	<body>
		<form action="greet">
		    <h1>Welcome to Our Application</h1>
		    Enter name : <input type="text" name="name" />
		    <br />
		    <button type="submit">Submit</button>
		</form>
	</body>
	// GreetServlet.java
	@WebServlet("/greet")
	public class GreetUser extends HttpServlet {
		public void doGet(HttpServletRequest req, HttpServletResponse resp) throws IOException {
			String name = req.getParameter("name");

			PrintWriter pw = resp.getWriter();
			pw.append(name+", Good Morning !!");
		}
	}
- In the above code action attribute represents Servlet URL pattern.
- Here
getParameter()is used to capture the data from the request object.
GET Method
- When user submit the form by default browser will consider that as get request
- Get request is used to get the data from the server hence get request will not contain request body
- To handle the get request servlet should have
doGet()method
POST Method
- When we are dealing with form submissions we need to use post request to send form data to server in request body.
- To submit a post request we need to use
method="post"in the form. - When we are sending post request to servlet we should have
doPost()to handle post request.
	<!-- Insert Book Form -->
	<body>
		<form action="bookServlet" method="post">
			Book Id : <input type="number" name="bookId"> <br>
			Book Name : <input type="text" name="bookName"> <br>
			Book Price : <input type="number" name="bookPrice"> <br>
			<button type="submit">Submit</button>
		</form>
	</body>
	// Book Servlet to capture form data
	@WebServlet("/bookServlet")
	public class BookServlet extends HttpServlet {
		public void doPost(HttpServletRequest req, HttpServletResponse res) throws IOException{
			String bookId = req.getParameter("bookId");
			String bookName = req.getParameter("bookName");
			String bookPrice = req.getParameter("bookPrice");

			System.out.println(bookId);
			System.out.println(bookName);
			System.out.println(bookPrice);

			PrintWriter pw = res.getWriter();

			pw.write("Form Submitted");
		}
	}
Servlet Application with DAO Layer
	HTML Page ===========> User interface (Presentation Logic)
	Servlet ======> To handle User Request & Response
	JDBC ====> To communicate with Database
Note: We can write JDBC logic inside Servlet class but it is not recommended.
- We should create DAO class to write JDBC logic.
- DAO stands for Data Access Object.
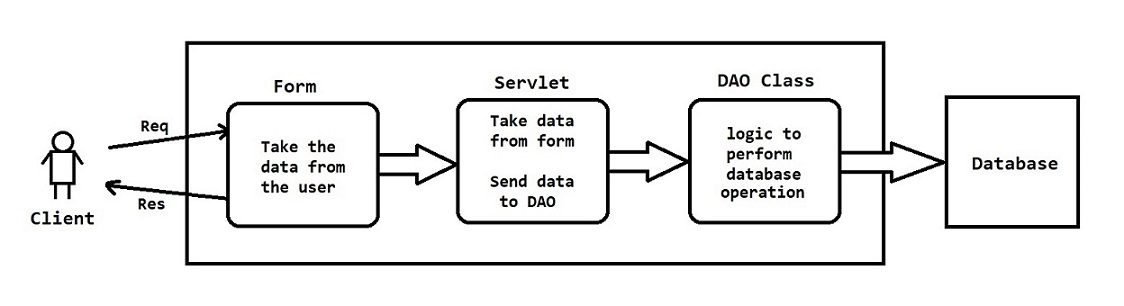
Note: For every table one DAO class we have to create.
Components
	index.html ====> Presentation Logic
	BookServlet.java ====> To handle request & response
	BookDAO.java  ====> Persistence Logic (CRUD)
	ConnectionFactory.java ====> To handle ConnectionPool
	// Book DAO class to insert book into DB
	public class BookDAO {
		private static final String INSERT_SQL = "insert into books values(?,?,?)";

		public boolean saveBook(BookDTO dto) throws Exception {
			// logic
			return count > 0;
		}
	}
- In the above DAO class, saveBook( ) method is taking BookDTO object as parameter.
- DTO stands for Data Transfer Object. It is used to transfer the data from one class method to another class method.
Note: In the above project, Servlet class capturing the data from the form and Storing into BookDTO object and calling DAO class method by giving BookDTO object as parameter.
	// Book DTO class to transfer book data
	public class BookDTO {

		private int bookId;
		private String bookName;
		private double bookPrice;

		// setters & getters
	}
Request Dispatcher
-
It is a predefined interface in
javax.servletpackage (Servlet API) -
It is used to redirect the request from one resource to another resource
RequestDispatcher rd = request.getRequestDispatcher("resource-url"); rd.forward(request, response); rd.include(request, response); -
If we redirect request from first servlet to second servlet using forward method then only second servlet response will go to client.
-
If we redirect request from first servlet to second servlet using include method then both servlets responses will go to client.
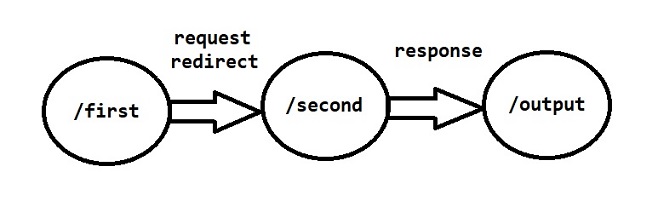
	// Servlet app to redirect client request

	// FirstServlet.java
	@WebServlet("/first")
	public class FirstServlet extends HttpServlet {
		public void doGet(HttpServletRequest req, HttpServletResponse resp) throws IOException, ServletException {
			PrintWriter pw = resp.getWriter();
			pw.write("<h1>First Servlet Response</h1>");

			RequestDispatcher rd = req.getRequestDispatcher("second");
			//rd.forward(req, resp);
			rd.include(req, resp);
		}
	}

	// SecondServlet.java
	@WebServlet("/second")
	public class SecondServlet extends HttpServlet {
		public void doGet(HttpServletRequest req, HttpServletResponse resp) throws IOException {
			PrintWriter pw = resp.getWriter();
			pw.write("<h1>Second Servlet Response</h1>");
		}
	}
Usecase
	LoginServlet.java ===> Responsible to verify User Login Credentials.
	MyCourseServlet.java ===> Responsible to display logged in user purchased courses.
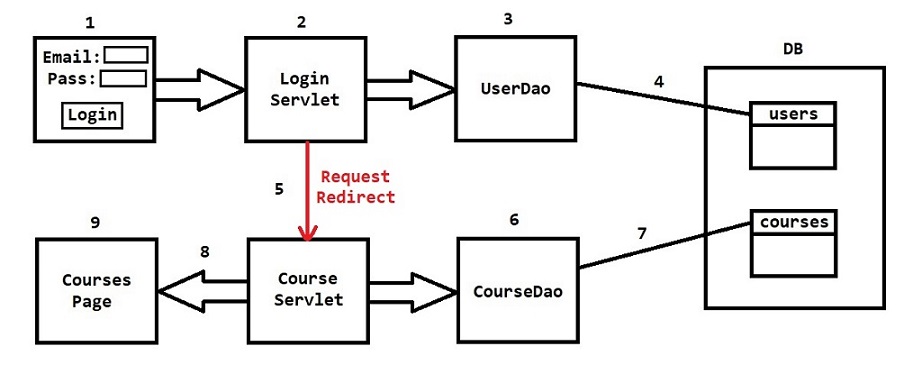
ServletConfig & ServletContext
- Predefined interfaces available in
javax.servletpackage - ServletConfig is specific to one servlet (Every Servlet will contain its own ServletConfig object)
- By Using ServletConfig obj we can pass init-parameters to servlet
Note: To use init-parameters we have to define url-pattern in web.xml
- ServletContext is specific to one application (One application will contain one ServletContext object)
- By Using ServletContext obj we can pass context-parameters to all servlets available in the application.
Note: Context parameter should be available outside of servlet tag.
- To read context parameters we need to get servlet context object.
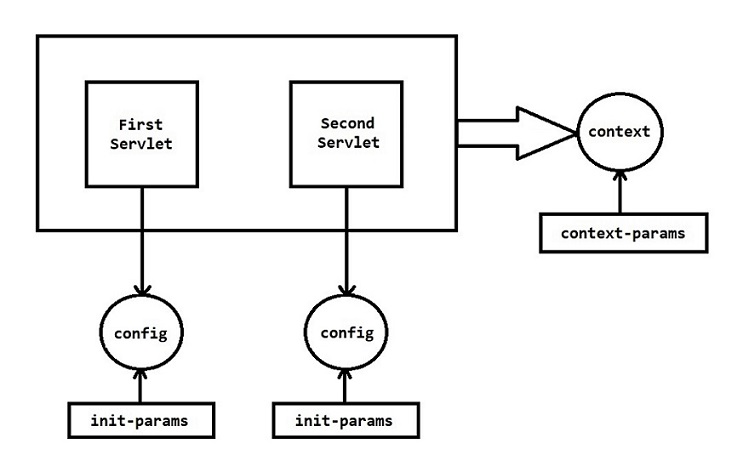
	<!-- ServletConfig & ServletContext using web.xml -->
	<context-param>
	  	<param-name>greet</param-name>
	  	<param-value>Welcome</param-value>
	  </context-param>

	  <servlet>
	  	<servlet-name>firstServlet</servlet-name>
	  	<servlet-class>in.ashokit.servlet.FirstServlet</servlet-class>
	  	<init-param>
	  		<param-name>msg1</param-name>
	  		<param-value>This is First Servlet</param-value>
	  	</init-param>
	  </servlet>

	  <servlet-mapping>
	  	<servlet-name>firstServlet</servlet-name>
	  	<url-pattern>/first</url-pattern>
	  </servlet-mapping>

	  <servlet>
	  	<servlet-name>secondServlet</servlet-name>
	  	<servlet-class>in.ashokit.servlet.SecondServlet</servlet-class>
	  	<init-param>
	  		<param-name>msg2</param-name>
	  		<param-value>This is Second Servlet</param-value>
	  	</init-param>
	  </servlet>

	  <servlet-mapping>
	  	<servlet-name>secondServlet</servlet-name>
	  	<url-pattern>/second</url-pattern>
	  </servlet-mapping>
	//  Servlet app using ServletConfig & ServletContext

	// FirstServlet.java
	public class FirstServlet extends HttpServlet {
		public void doGet(HttpServletRequest req, HttpServletResponse resp) throws IOException {
			PrintWriter pw = resp.getWriter();

			// getting context object
			ServletContext servletContext = getServletContext();
			String greet = servletContext.getInitParameter("greet");

			// getting config object
			ServletConfig servletConfig = getServletConfig();
			String msg = servletConfig.getInitParameter("msg1");

			pw.write(greet+", "+msg);
		}
	}

	// SecondServlet.java
	public class SecondServlet extends HttpServlet {
		public void doGet(HttpServletRequest req, HttpServletResponse resp) throws IOException {
			PrintWriter pw = resp.getWriter();

			// getting context object
			ServletContext servletContext = getServletContext();
			String greet = servletContext.getInitParameter("greet");

			// getting config object
			ServletConfig servletConfig = getServletConfig();
			String msg = servletConfig.getInitParameter("msg2");

			pw.write(greet + ", " + msg);
		}
	}
Servlet Questions
Q-1) How many objects will be created for a servlet class when we send multiple requests ?
- Only one object will be created that also when we send first request
Q-2) How many ways are there to create our own servlet ?
-
We can create Servlet class in 3 ways
  	a) Servlet interface
  	b) GenericServlet class
  	c) HttpServlet class
Q-3) Servlet (I) vs GenericServlet (AC) Vs HttpServlet (C) ?
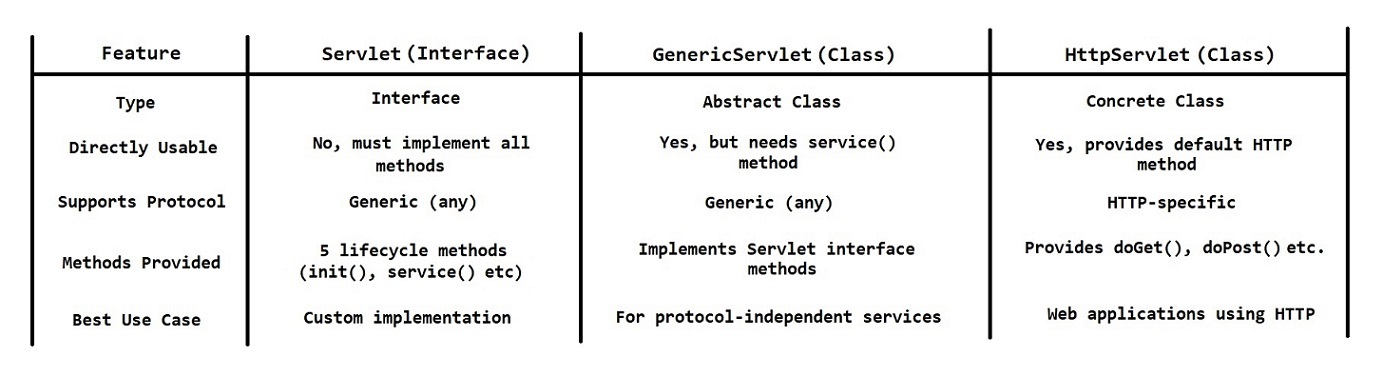
Q-4) What is Servlet Life Cycle ?
-
init( ), service( ) and destroy( ) are called as servlet life cycle methods.
  	init ( ) ---> it will be called for first request
  	service ( ) --> it will be called for every request
  	destroy ( ) ---> it will be called when servlet obj removed from container
-
When we send first request to the servlet init( ) will be called and it will create servlet config object with init parameters.
-
service( ) will be called for every client request.
-
destroy( ) will be called when the servlet object removed from servlet container
Q-5) What is the difference between RequestDispatcher and sendRedirect ( ) method ?
- RequestDispatcher is used to redirect the request from one resource to another resource in same server (Ex: ServletOne to ServletTwo)
sendRedirect(String url)method is used to redirect request from one server to another server (Ex: Servlet to Google)
.jpg)
	// Servlet app on RequestDispatcher vs sendRedirect()

	// FirstServlet.java
	@WebServlet("/first")
	public class FirstServlet extends HttpServlet {
		public void doGet(HttpServletRequest req, HttpServletResponse resp) throws IOException, ServletException {
			PrintWriter pw = resp.getWriter();
			pw.write("<h1>First Servlet</h1>");

			// Request Dispatch
			RequestDispatcher rd = req.getRequestDispatcher("second");
			rd.forward(req, resp);
		}
	}

	// SecondServlet.java
	@WebServlet("/second")
	public class SecondServlet extends HttpServlet {
		public void doGet(HttpServletRequest req, HttpServletResponse resp) throws IOException, ServletException {
			PrintWriter pw = resp.getWriter();
			pw.write("<h1>Second Servlet</h1>");
		}
	}

	// ThirdServlet.java
	@WebServlet("/third")
	public class ThirdServlet extends HttpServlet {
		public void doGet(HttpServletRequest req, HttpServletResponse resp) throws IOException, ServletException {
			System.out.println("Third Servlet");

			// Request Redirect
			resp.sendRedirect("https://www.google.com");
		}
	}
Q-6) What are scoped variables in Servlets ?
-
Scoped variables are used to store and exchange the data from one resource to another resource
  -> Request Scope : data will be available till request processing is completed
  -> Page Scope : data will be available till you are on the same page (reloading or going to another page will lost the data)
  -> Session Scope : data will be available untill user logout from the application
  -> Application Scope : data will be available througout the execution of the application (untill server will stop)
Note: Request Scope also called as local scope.
Q-7) What is the difference between request & session in web app ?
- Request is used to store single request specific info. Once request processing completed request object will be deleted from the server.
- Session is used to store user identity information. Once user login into application we will store user identity in the session and when user logout from the application then we will close the session of the user.
Q-8) What is request parameter ?
- Request Parameters are also called as Query Parameters.
- Query Parameters are used to send the data to server in the URL in the form of key - value pair.
- Query Parameters will start with
?symbol - If we have multiple query parameters then we have to separate them by using
&symbol - Query Parameters should present only at end of the URL
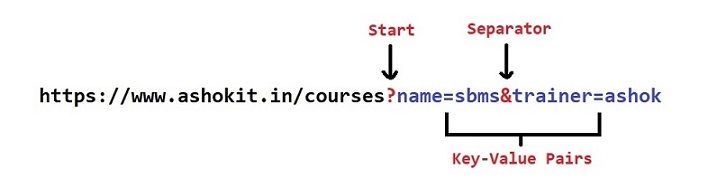
-
To read data from query parameters we will use
request.getParameter("key");
JSP
What is JSP ?
-
JSP stands for Java Server Pages
-
JSP is used to develop presentation logic
-
Inside JSP we can write HTML tags for presentation logic
-
Every JSP will be converted into Servlet in the background
  	Servlet ===> To write business logic
  	JSP ===> To write presentation logic
-
Servlet will be processed by Servlet Container
-
JSP will be processed by JSP container
Note: Servlet Container and JSP container will be part of Server.
Note: The main purpose of JSP is to separate presentation logic and business logic.
JSP Questions
Q-1) What is Scriptlet in JSP ?
Q-2) What is directive in JSP ?
Q-3) What are jsp implicit objects ?
Q-4) What is JSP lifecycle ?
Q-5) jsp include vs jsp forward ?
Q-6) What is JSTL ?
MVC
MVC Architecture
-
MVC stands for Model View Controller
  	Model ---> Represents Data
  	View ---> Presentation Logic
  	Controller ---> It handles request & response
-
It is a Design Pattern to develop our application components with loosely coupling.
-
If we develop our application with MVC design pattern then maintenance of the application will become easy.
-
UI Layer contains presentation logic related files
HTMl / JSP / Angular / React / Vue
-
Web Layer contains controllers to handle request & response logics
Servlets / Spring Controllers
-
DAO layer contains persistence logic (DB) related classes
JDBC / Hibernate / Spring ORM / Data JPA
-
DTO layer contains classes which are used to represent data.

Note: DTO classes are used to transfer data from one layer to another layer.
Note: If we develop our application with above architecture then it is called as Layered Architecture Based Application.
Note: Tomorrow if we want to change DAO layer logic from JDBC to hibernate then we can change only DAO layer classes without touching web layer & UI layer components. This is called as Loosely Coupling.
Filters & Session Tracking
Filters
- Filters are used to trap all requests & responses
- By using filters we can execute Pre Processing & Post Processing logics
- Pre Processing means, before servlet processing the request filter can access that request & filter can modify that request
- Post Processing means, after servlet process our request filter can access that response & filter can modify that response
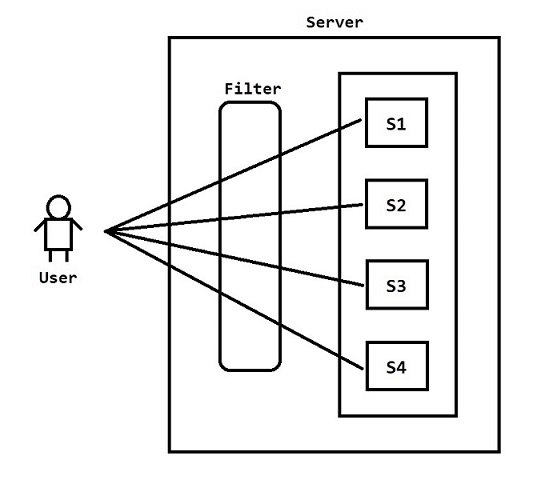
Note: By default, filters are executed based on their declaration order in the application. If manually configured filters execute in the order they are mapped in web.xml
Filter Use Cases
	1) Request Logging (storing request receive time)
	2) Authentication
	3) Page Visitors Count
	4) Request Modification
	5) Response Modification
	// Servlet App to count no of req

	// First Servlet
	@WebServlet("/first")
	public class FirstServlet extends HttpServlet {
		protected void doGet(HttpServletRequest request, HttpServletResponse response) throws ServletException, IOException {
			response.getWriter().write("I am from first servlet");
		}
	}

	// Second Servlet
	@WebServlet("/second")
	public class SecondServlet extends HttpServlet {
		protected void doGet(HttpServletRequest request, HttpServletResponse response) throws ServletException, IOException {
			response.getWriter().write("I am from second servlet");
		}
	}

	// Filter to count req
	@WebFilter(urlPatterns = "/*")
	public class MyFilter extends HttpFilter implements Filter {
		private static Integer count = 0;

		public void doFilter(ServletRequest request, ServletResponse response, FilterChain chain) throws IOException, ServletException {
			count++;

			System.out.println("Filter Executed");

			response.getWriter().write("Request Count :: "+count);
			response.getWriter().write("\n");

			chain.doFilter(request, response);
		}
	}
Note: The above filter having the url pattern as /* that means this filter will execute for all the requests coming to our application
Note: chain.doFilter() is used for filter chaining that means it will call the next filter available in the application. If there is no filter available than it will forward the request to actual resource (servlet or jsp)
	// Request filtering based on time

	// First Servlet
	@WebServlet("/first")
	public class FirstServlet extends HttpServlet {
		protected void doGet(HttpServletRequest request, HttpServletResponse response) throws ServletException, IOException {
			response.getWriter().write("I am from first servlet");
		}
	}

	// Second Servlet
	@WebServlet("/second")
	public class SecondServlet extends HttpServlet {
		protected void doGet(HttpServletRequest request, HttpServletResponse response) throws ServletException, IOException {
			response.getWriter().write("I am from second servlet");
		}
	}

	// Request Filtering based on time
	@WebFilter(urlPatterns = "/*")
	public class MyFilter extends HttpFilter implements Filter {
		public void doFilter(ServletRequest request, ServletResponse response, FilterChain chain) throws IOException, ServletException {
			LocalTime time = LocalTime.now();
			int hourOfDay = time.getHour();

			if(hourOfDay >= 9 && hourOfDay < 17) {
				chain.doFilter(request, response);
			} else {
				response.getWriter().write("Working Hours Over !!");
			}
		}
	}
Note: The above filter contains the logic to process the request which comes between 9 AM to 5 PM.
Session Tracking
-
User session will be represented from login to logout
-
In web applications mainly 2 actors will be available
  	1) Client
  	2) Server
-
Client & Server will communicate by using HTTP Protocol
-
HTTP is stateless protocol that means HTTP can't remember conversation happened between Client & Server
-
The application which can't remember client data is called as stateless application.
-
If we want our server to remember client data then we need to make our application as stateful application
  	Based on the logged in user, gmail inbox mails should display
  	Based on the logged in user, amazon order history should display
  	Based on the logged in user, purchased courses should display
![]()
Note: To implement all the above requirements, application should remember logged in user data.
-
To remember logged in user data we will use Session Management in web applications.
-
Session Management can be implemented in below ways
  	1) Cookies (Not Recommended)
  	2) Hidden Form Fields (Not Recommended)
  	3) URL Re-Writing (Not Recommended)
  	4) HttpSession (Recommended Approach)
Cookies
- Cookie is a small piece of information which will store in browser
- Cookie will represent data in form of key-value pair
- We can create Cookie object like below
	Cookie cookie = new Cookie("email", "ashok@gmail.com");
	resp.addCookie(cookie);
- If client disable Cookies in browser then cookie based web application will not work hence cookies are not recommended to use

	// Servlet App using Cookies

	// First Servlet
	@WebServlet("/first")
	public class FirstServlet extends HttpServlet {
		@Override
		protected void doGet(HttpServletRequest req, HttpServletResponse resp) throws ServletException, IOException {
			Cookie cookie = new Cookie("email", "ashok@gmail.com");
			resp.addCookie(cookie);

			resp.getWriter().write("First Servlet");
		}
	}

	// Second Servlet
	@WebServlet("/second")
	public class SecondServlet extends HttpServlet {
		@Override
		protected void doGet(HttpServletRequest req, HttpServletResponse resp) throws ServletException, IOException {
			Cookie[] cookies = req.getCookies();
			String  value = null;

			if(cookies != null) {
				value = cookies[0].getValue();
			}

			if(value != null && !value.equals("")) {
				resp.getWriter().write("Second Servlet");
			} else {
				resp.getWriter().write("Invalid Request");
			}
		}
	}
Hidden Form Fields
- By using Hidden Form Fields we can make our application as stateful.
- Server will send hidden form field to client and client will submit hidden form field to server.
- As data is exchanging several times between client and server it is not recommended to use this approach to make application as stateful.
	// Servlet App using Hidden Form Fields

	// First Servlet
	@WebServlet("/first")
	public class FirstServlet extends HttpServlet {
		@Override
		protected void doGet(HttpServletRequest req, HttpServletResponse resp) throws ServletException, IOException {
			resp.setContentType("text/html");

			PrintWriter pw = resp.getWriter();

			pw.write("<form action=\"second\" method=\"get\">");
			pw.write("<input type=\"hidden\" name=\"uname\" value=\"raja\"/>");
			pw.write("<button type=\"submit\">Submit</button>");
			pw.write("</form>");
		}
	}

	// Second Servlet
	@WebServlet("/second")
	public class SecondServlet extends HttpServlet {
		@Override
		protected void doGet(HttpServletRequest req, HttpServletResponse resp) throws ServletException, IOException {
			String uname = req.getParameter("uname");
			PrintWriter pw = resp.getWriter();

			if(uname != null && !uname.equals("")) {
				pw.write("I am from second servlet");
			} else {
				pw.write("Invalid Request");
			}
		}
	}
URL Re-Writing
- It is used to append client data by modifying URL
Note: Data is visible in URL hence it is not recommended approach.
	// Servlet App using URL Re-Writing

	// First Servlet
	@WebServlet("/first")
	public class FirstServlet extends HttpServlet {
		@Override
		protected void doGet(HttpServletRequest req, HttpServletResponse resp) throws ServletException, IOException {
			resp.sendRedirect("http://localhost:8081/App/second?uname=raja");
		}
	}

	// Second Servlet
	@WebServlet("/second")
	public class SecondServlet extends HttpServlet {
		@Override
		protected void doGet(HttpServletRequest req, HttpServletResponse resp) throws ServletException, IOException {
			String uname = req.getParameter("uname");
			PrintWriter pw = resp.getWriter();

			if(uname != null && !uname.equals("")) {
				pw.write("I am from second servlet");
			} else {
				pw.write("Invalid Request");
			}
		}
	}
HttpSession
- It is used to maintain user session data
- It is highly recommended approach to develop Stateful Web Applications
- When user login successfully we will create session object and we will store user data in session.
- When user logout from the application we will remove the session object.
Note: For every user one session object will be created.
	// Servlet App using HttpSession

	// First Servlet
	@WebServlet("/first")
	public class FirstServlet extends HttpServlet {
		@Override
		protected void doGet(HttpServletRequest req, HttpServletResponse resp) throws ServletException, IOException {
			// creating new session
			HttpSession session = req.getSession();
			session.setAttribute("email", "ashok@gmail.com");

			resp.getWriter().write("Session Created");
		}
	}

	// Second Servlet
	@WebServlet("/second")
	public class SecondServlet extends HttpServlet {
		@Override
		protected void doGet(HttpServletRequest req, HttpServletResponse resp) throws ServletException, IOException {
			// return existing session
			HttpSession session = req.getSession(false);
			PrintWriter pw = resp.getWriter();
			String email = null;

			if(session != null) {
				email = (String) session.getAttribute("email");
			}

			if(email != null && !email.equals("")) {
				pw.write("I am from second servlet");
			} else {
				pw.write("Invalid Request");
			}
		}
	}

	// Logout Servlet
	@WebServlet("/logout")
	public class LogoutServlet extends HttpServlet {
		@Override
		protected void doGet(HttpServletRequest req, HttpServletResponse resp) throws ServletException, IOException {
			// return existing session
			HttpSession session = req.getSession(false);
			PrintWriter pw = resp.getWriter();

			if(session != null) {
				// terminate existing session
				session.invalidate();
				pw.write("Logged Out");
			} else {
				pw.write("Invalid Request");
			}
		}
	}
Minor Requirements
Requirement 1
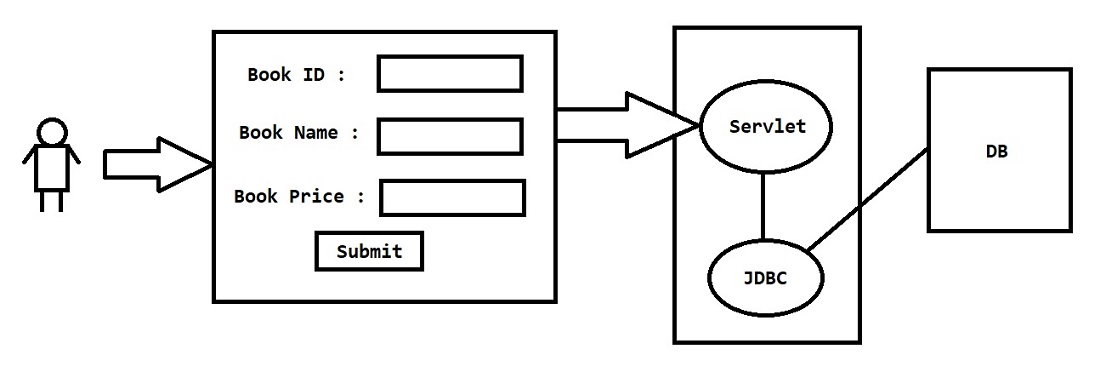
Requirement 2
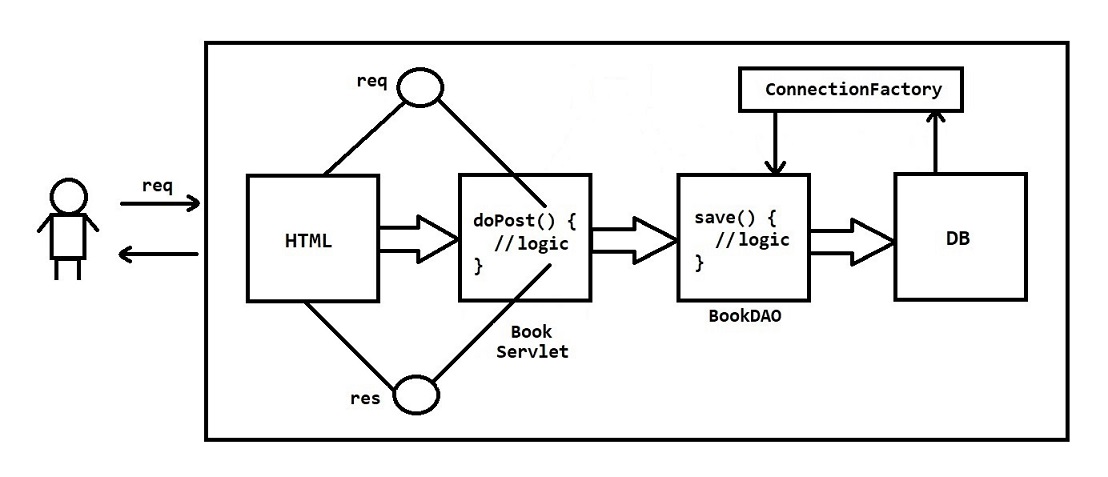
Requirement 3
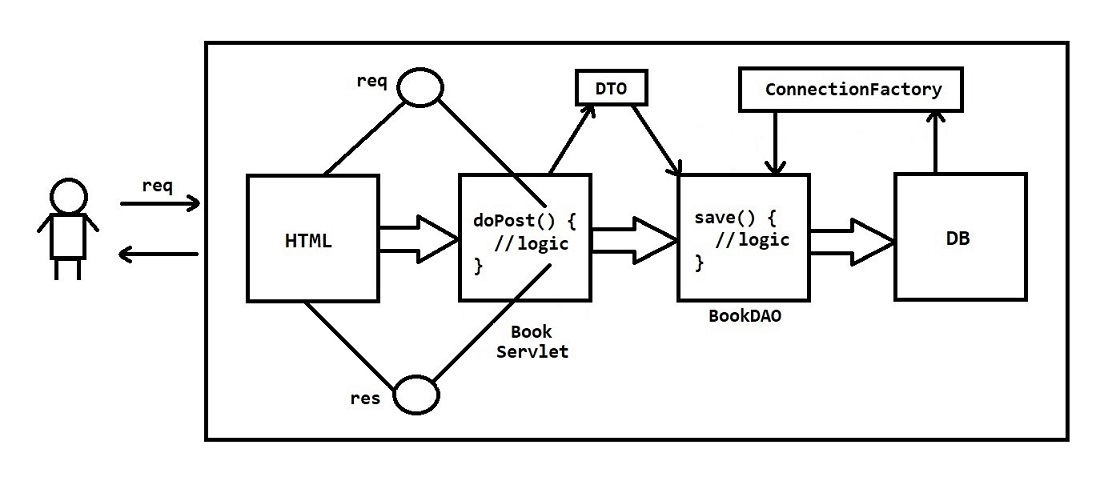
Requirement 4

Requirement 5
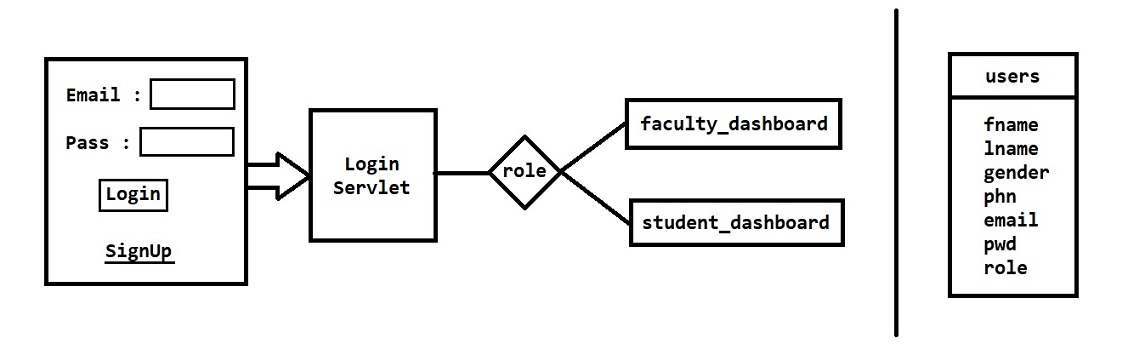
Requirement 6
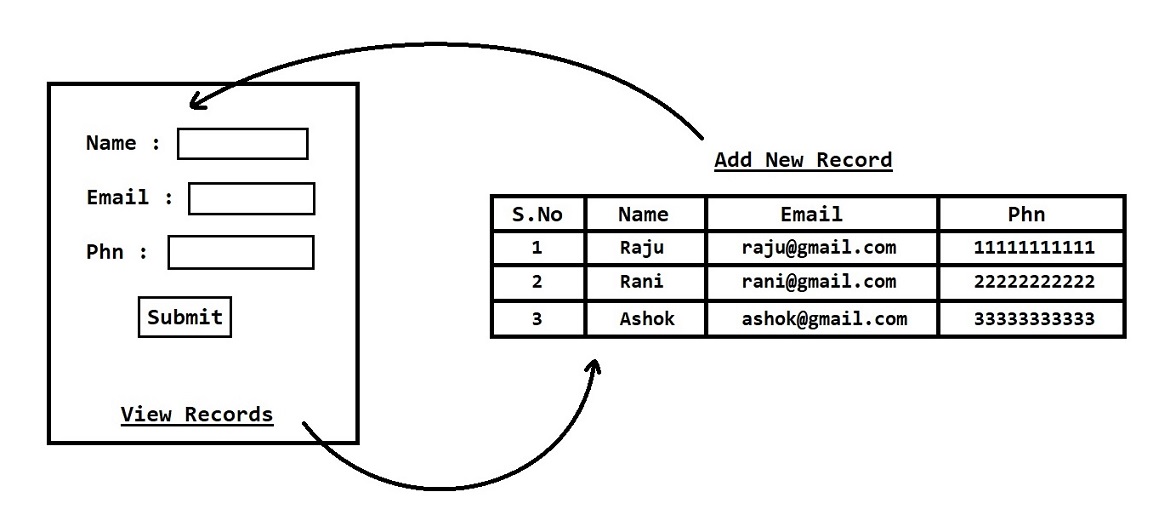
Requirement 7
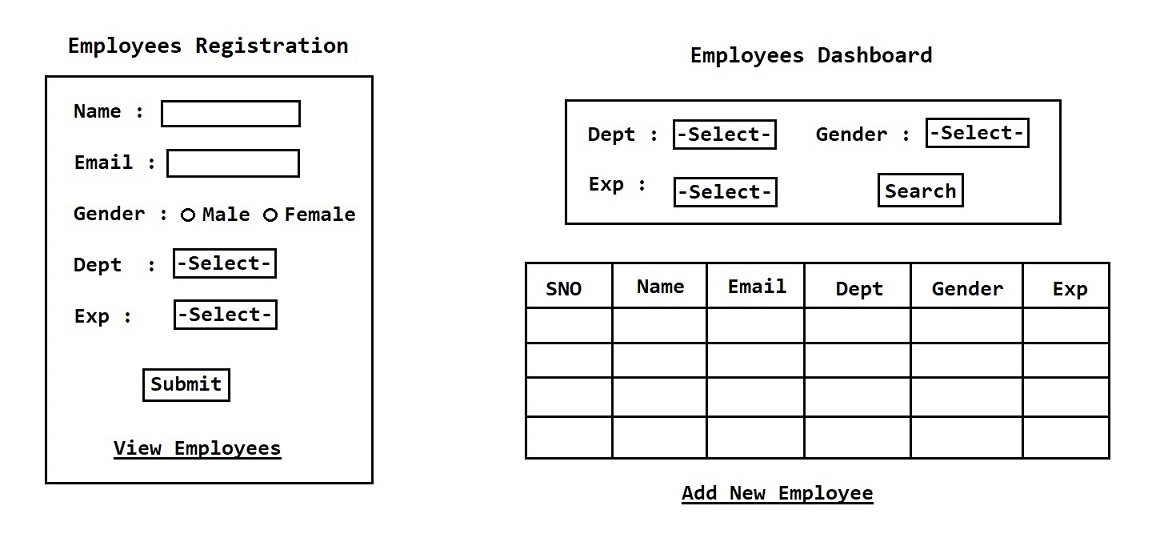
Major Requirement
- Develop web application with below pages
Login Page
		1.1) Email text field
		1.2) Pwd text Filed
		1.3) Login Button
		1.4) Forgot Pwd Hyperlink
		1.5) Sign Up hyperlink
Registration Page
		2.1) Fname text field
		2.2) Lname text field
		2.3) Email text field
		2.4) Pwd text field
		2.5) Gender radio button
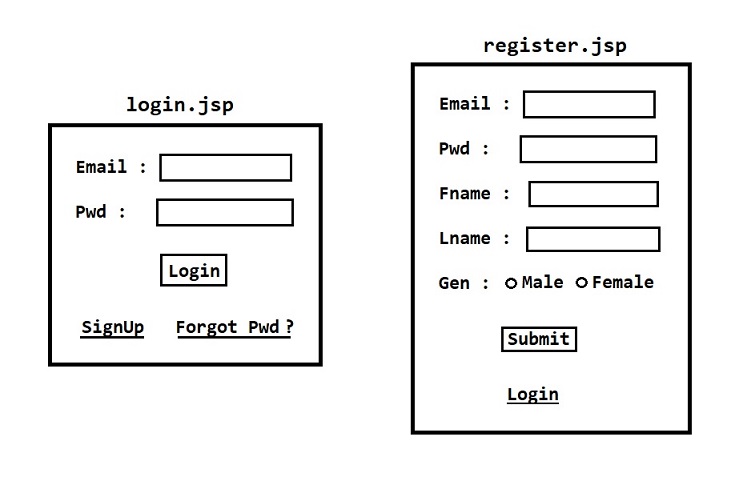
Forgot Password Page
3.1) Email
Reset Password Page
		4.1) Email as lablel
		4.2) New Pwd
		4.3) Confirm Pwd

Dashboard Page
-
Dashboard page should display left side menu with below names
  	5.1) Address Screen (City, State, Country and Submit button)
  	5.2) Education (Highest Qualification, Passout year, Percentage in Highest Qualification and Submit button)
  	5.3) Family Details (Father Name, Mother Name, No.of Siblings and Submit button)
  	5.4) Logout